Trong hướng dẫn này, IoTZone sẽ hướng dẫn cách xây dựng Web Server để điều khiển động cơ ESP32 Servo dễ dàng. Chúng ta sẽ sử dụng thanh trượt, cùng tìm hiểu nhé!
Thiết bị cần dùng
- ESP32
- Động cơ Servo
- Dây Jumper
Giới thiệu về Servo
Các dây tín hiệu trên Servo
Thông thường, Servo có 3 dây khác nhau là GND (màu đen hoặc nâu), Signal (màu vàng, cam hoặc trắng) và Power (màu đỏ):
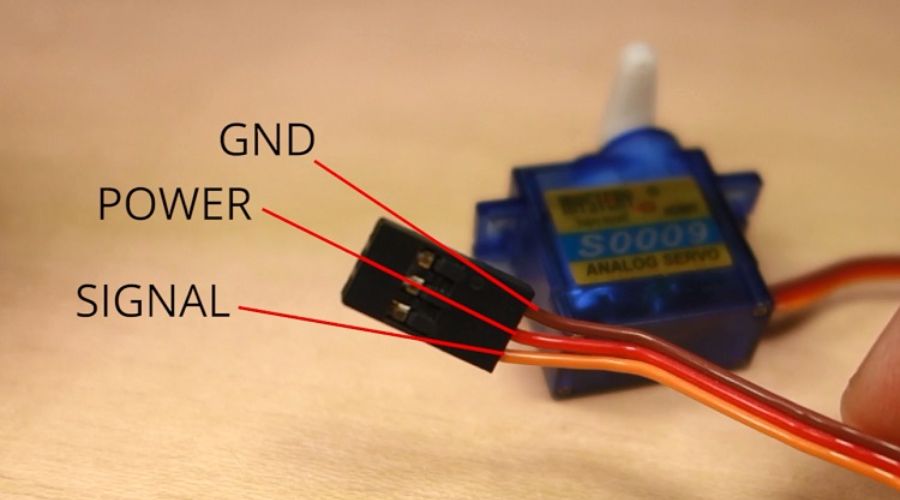
Nếu sử dụng các loại Servo nhỏ như S0009 mình đang dùng, thì bạn hoàn toàn có thể cấp nguồn từ mạch ESP32.
Tuy nhiên, nếu bạn dùng các loại Servo loại cao cấp như MG996R hoặc dùng nhiều Servo cùng lúc, bạn cần phải cấp thêm nguồn điện bên ngoài nhé!
Để kết nối Servo với ESP32, bạn nối dây như sau:
| Servo | ESP32 |
| GND | GND |
| Power | Cổng VIN |
| Signal | GPIO 13 (hoặc bất kỳ cổng PWM nào khác) |
Tuy nhiên, mình khuyên bạn không kết nối Signal Servo vào cổng GPIO 9, 10 và 11 nhé! Vì các cổng này đã được kết nối với Flash SPI tích hợp trong mạch, chúng ta không nên kết nối thêm phần cứng nào khác bên ngoài vào cổng này.
Cách điều khiển Servo
Chúng ta có thể điều khiển Servo quay tới một góc chính xác nằm trong khoảng 0° – 180°, thông qua các xung tín hiệu PWM. Để điều khiển Servo bằng ESP32, bạn chỉ cần gửi tín hiệu 50Hz với độ rộng xung phù hợp với Servo là được.
Hoặc đơn giản hơn, mình sẽ hướng dẫn bạn cách sử dụng thư viện để điều khiển ESP32 Servo nhé!
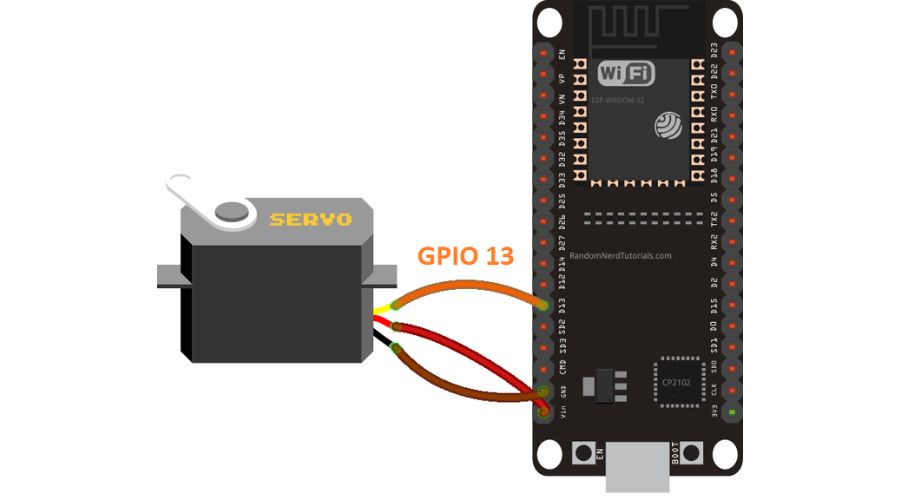
Kết nối phần cứng
Bạn kết nối Servo với ESP32 qua cổng GPIO 13 như hình sau:
Cài đặt Arduino IDE
Cài tiện ích ESP32
Trước tiên, để điều khiển ESP32 Servo thì bạn cần cài tiện ích ESP32 trong Arduino IDE trước, theo hướng dẫn sau: Cách lập trình ESP32 bằng Arduino IDE (Windows, Linux, Mac OS X)
Cài thư viện ESP32 Servo
Thư viện ESP32 Servo sẽ giúp bạn điều khiển động cơ dễ dàng hơn, bạn làm theo các bước sau để cài đặt thư viện nhé:
- Click vào link để tải thư viện xuống
- Giải nén và đổi tên thư viện thành ESP32_Arduino_Servo_Library
- Di chuyển thư viện vào trong folder thư viện của Arduino IDE
- Tắt và mở lại Arduino
Chạy chương trình mẫu cơ bản
Trong thư viện ESP32 Servo vừa cài đã có sẵn một số chương trình mẫu. Bạn hãy mở Arduino IDE, chọn đúng mạch ESP32 của mình và click vào File > Examples > ServoESP32 > Simple Servo nhé. Chúng ta sẽ có đoạn code như sau:
#include <Servo.h>

Servo myservo;  // create servo object to control a servo
// twelve servo objects can be created on most boards

int pos = 0;    // variable to store the servo position

void setup() {
  myservo.attach(13);  // attaches the servo on pin 13 to the servo object
}

void loop() {
  for (pos = 0; pos <= 180; pos += 1) { // goes from 0 degrees to 180 degrees
    // in steps of 1 degree
    myservo.write(pos);              // tell servo to go to position in variable 'pos'
    delay(15);                       // waits 15ms for the servo to reach the position
  }
  for (pos = 180; pos >= 0; pos -= 1) { // goes from 180 degrees to 0 degrees
    myservo.write(pos);              // tell servo to go to position in variable 'pos'
    delay(15);                       // waits 15ms for the servo to reach the position
  }
}

1
Giải thích chương trình
Chương trình ESP32 Servo cơ bản trên sẽ điều khiển Servo lần lượt xoay tới các góc 180 độ và 0 độ. Dưới đây mình sẽ giải thích chi tiết hơn:
Khai báo thư viện Servo:
#include <Servo.h>
Tạo đối tượng Servo:
Servo myservo;
Setting()
Khởi tạo giao tiếp Serial để debugging (sửa lỗi) khi cần, và gán cổng Servo vào cổng GPIO 13:
void setup() {
  myservo.attach(13);
}
Loop()
Thay đổi vị trí góc xoay của Servo từ 180 độ đến 0 độ và ngược lại liên tục bên trong vòng lặp loop, bằng câu lệnh sau:
myservo.write(pos);
Trong đó, bạn điền vào số nguyên đại diện cho góc cần xoay của động cơ Servo nhé! Bây giờ, bạn hãy nạp code vào ESP32. Bạn sẽ thấy động cơ Servo quay sang bên trái rồi lại quay sang bên phải liên tục.
Xây dựng Web Server điều khiển ESP32 Servo
Bây giờ sẽ là nội dung chính của bài hướng dẫn này: tạo Web Server để điều khiển động cơ Servo. WebServer gồm các phần sau:
- Chứa 1 thanh trượt có giá trị từ 0 độ đến 180 độ, để chúng ta điều chỉnh góc quay của SErvo
- Giá trị thanh trượt sẽ được tự động cập nhật trên trang Web, chúng ta không cần F5 trang web để cập nhật giá trị
- Việt f5 trang Web không làm thay đổi giá trị thanh trượt
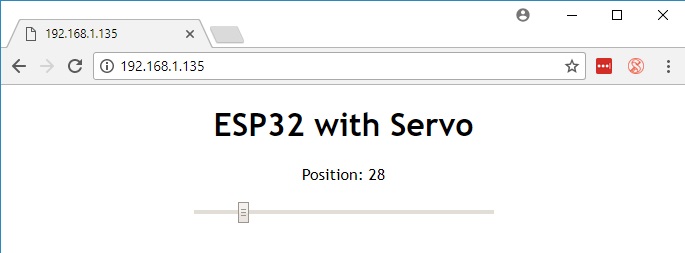
Tạo Web bằng HTML
Dưới đây là đoạn văn bản HTML mà ESP32 gửi tới trình duyệt trên điện thoại / laptop, để trình duyệt hiển thị trang Web như hình trên:
<!DOCTYPE html>
<html>
<head>
  <meta name="viewport" content="width=device-width, initial-scale=1">
  <link rel="icon" href="data:,">
  <style>
    body {
      text-align: center;
      font-family: "Trebuchet MS", Arial;
      margin-left:auto;
      margin-right:auto;
    }
    .slider {
      width: 300px;
    }
  </style>
  <script src="https://ajax.googleapis.com/ajax/libs/jquery/3.3.1/jquery.min.js"></script>
</head>
<body>
  <h1>ESP32 with Servo</h1>
  <p>Position: <span id="servoPos"></span></p>
  <input type="range" min="0" max="180" class="slider" id="servoSlider" onchange="servo(this.value)"/>
  <script>
    var slider = document.getElementById("servoSlider");
    var servoP = document.getElementById("servoPos");
    servoP.innerHTML = slider.value;
    slider.oninput = function() {
      slider.value = this.value;
      servoP.innerHTML = this.value;
    }
    $.ajaxSetup({timeout:1000});
    function servo(pos) {
      $.get("/?value=" + pos + "&");
      {Connection: close};
    }
  </script>
</body>
</html>
Chương trình code
Bây giờ, chúng ta sẽ đưa đoạn HTML trên vào trong đoạn code để ESP32 điều khiển Servo cho phù hợp. Bạn hãy copy đoạn code này vào Arduino IDE nhé:
/*********
  Rui Santos
  Complete project details at http://randomnerdtutorials.com
*********/

#include <WiFi.h>
#include <Servo.h>

Servo myservo;  // create servo object to control a servo
// twelve servo objects can be created on most boards

// GPIO the servo is attached to
static const int servoPin = 13;

// Replace with your network credentials
const char* ssid     = "REPLACE_WITH_YOUR_SSID";
const char* password = "REPLACE_WITH_YOUR_PASSWORD";

// Set web server port number to 80
WiFiServer server(80);

// Variable to store the HTTP request
String header;

// Decode HTTP GET value
String valueString = String(5);
int pos1 = 0;
int pos2 = 0;

// Current time
unsigned long currentTime = millis();
// Previous time
unsigned long previousTime = 0;
// Define timeout time in milliseconds (example: 2000ms = 2s)
const long timeoutTime = 2000;

void setup() {
  Serial.begin(115200);

  myservo.attach(servoPin);  // attaches the servo on the servoPin to the servo object

  // Connect to Wi-Fi network with SSID and password
  Serial.print("Connecting to ");
  Serial.println(ssid);
  WiFi.begin(ssid, password);
  while (WiFi.status() != WL_CONNECTED) {
    delay(500);
    Serial.print(".");
  }
  // Print local IP address and start web server
  Serial.println("");
  Serial.println("WiFi connected.");
  Serial.println("IP address: ");
  Serial.println(WiFi.localIP());
  server.begin();
}

void loop(){
  WiFiClient client = server.available();   // Listen for incoming clients

  if (client) {                             // If a new client connects,
    currentTime = millis();
    previousTime = currentTime;
    Serial.println("New Client.");          // print a message out in the serial port
    String currentLine = "";                // make a String to hold incoming data from the client
    while (client.connected() && currentTime - previousTime <= timeoutTime) { // loop while the client's connected
      currentTime = millis();
      if (client.available()) {             // if there's bytes to read from the client,
        char c = client.read();             // read a byte, then
        Serial.write(c);                    // print it out the serial monitor
        header += c;
        if (c == '\n') {                    // if the byte is a newline character
          // if the current line is blank, you got two newline characters in a row.
          // that's the end of the client HTTP request, so send a response:
          if (currentLine.length() == 0) {
            // HTTP headers always start with a response code (e.g. HTTP/1.1 200 OK)
            // and a content-type so the client knows what's coming, then a blank line:
            client.println("HTTP/1.1 200 OK");
            client.println("Content-type:text/html");
            client.println("Connection: close");
            client.println();

            // Display the HTML web page
            client.println("<!DOCTYPE html><html>");
            client.println("<head><meta name=\"viewport\" content=\"width=device-width, initial-scale=1\">");
            client.println("<link rel=\"icon\" href=\"data:,\">");
            // CSS to style the on/off buttons
            // Feel free to change the background-color and font-size attributes to fit your preferences
            client.println("<style>body { text-align: center; font-family: \"Trebuchet MS\", Arial; margin-left:auto; margin-right:auto;}");
            client.println(".slider { width: 300px; }</style>");
            client.println("<script src=\"https://ajax.googleapis.com/ajax/libs/jquery/3.3.1/jquery.min.js\"></script>");

            // Web Page
            client.println("</head><body><h1>ESP32 with Servo</h1>");
            client.println("<p>Position: <span id=\"servoPos\"></span></p>");
            client.println("<input type=\"range\" min=\"0\" max=\"180\" class=\"slider\" id=\"servoSlider\" onchange=\"servo(this.value)\" value=\""+valueString+"\"/>");

            client.println("<script>var slider = document.getElementById(\"servoSlider\");");
            client.println("var servoP = document.getElementById(\"servoPos\"); servoP.innerHTML = slider.value;");
            client.println("slider.oninput = function() { slider.value = this.value; servoP.innerHTML = this.value; }");
            client.println("$.ajaxSetup({timeout:1000}); function servo(pos) { ");
            client.println("$.get(\"/?value=\" + pos + \"&\"); {Connection: close};}</script>");

            client.println("</body></html>");

            //GET /?value=180& HTTP/1.1
            if(header.indexOf("GET /?value=")>=0) {
              pos1 = header.indexOf('=');
              pos2 = header.indexOf('&');
              valueString = header.substring(pos1+1, pos2);

              //Rotate the servo
              myservo.write(valueString.toInt());
              Serial.println(valueString);
            }
            // The HTTP response ends with another blank line
            client.println();
            // Break out of the while loop
            break;
          } else { // if you got a newline, then clear currentLine
            currentLine = "";
          }
        } else if (c != '\r') {  // if you got anything else but a carriage return character,
          currentLine += c;      // add it to the end of the currentLine
        }
      }
    }
    // Clear the header variable
    header = "";
    // Close the connection
    client.stop();
    Serial.println("Client disconnected.");
    Serial.println("");
  }
}
1
Bạn hãy thay đổi thông tin đăng nhập mạng của bạn (gồm tên và mật khẩu WiFi) rồi nạp chương trình vào ESP32 nhé. Chúng ta sẽ tới bước tiếp theo – kiểm tra Web Server.
Kiểm tra Web Server
Bạn hãy mở Serial Monitor ở tốc độ 115200 để lấy địa chỉ IP của ESP32.
Dán địa chỉ IP mạch ESP32 vào trình duyệt để xem Web Server bạn đã tạo. Hãy thử kéo thanh trượt qua lại để điều khiển ESP32 Servo:

Trong Serial Monitor, bạn cũng có thể xem các yêu cầu HTTP đang được gửi trong hệ thống nhé!
Lời kết
Bài viết trên đã hướng dẫn chi tiết cách tạo một Web Server có thanh trượt, để điều khiển ESP32 Servo dễ dàng. Bạn có thể biến tấu thanh trượt thành ô nhập văn bản hoặc bất kỳ công tắc nào khác bạn thích thử xem nhé!