Trong dự án LoRa ESP32 Arduino này, chúng ta sẽ xây dựng một hệ thống để giám sát dữ liệu thu được từ cảm biến và gửi thông tin này qua LoRa đến máy thu ESP32. Bộ thu này sẽ hiển thị kết quả mới nhất từ cảm biến lên Web Server, để chúng ta theo dõi được từ xa qua điện thoại hoặc các thiết bị điện tử.
Cụ thể, IoTZone sẽ hướng dẫn bạn cách:
- Gửi kết quả đọc được từ cảm biến qua đài LoRa giữa 2 mạch ESP32
- Thêm các tính năng WiFi và LoRa vào dự án của bạn
- Sử dụng mạch TTGO LoRa32 SX1276 OLED hoặc các mạch tương tự khác cho các dự án IoT của bạn
Giới thiệu dự án LoRa ESP32 Arduino
Dưới đây là hình ảnh minh họa về dự án mà mình sẽ hướng dẫn bạn:
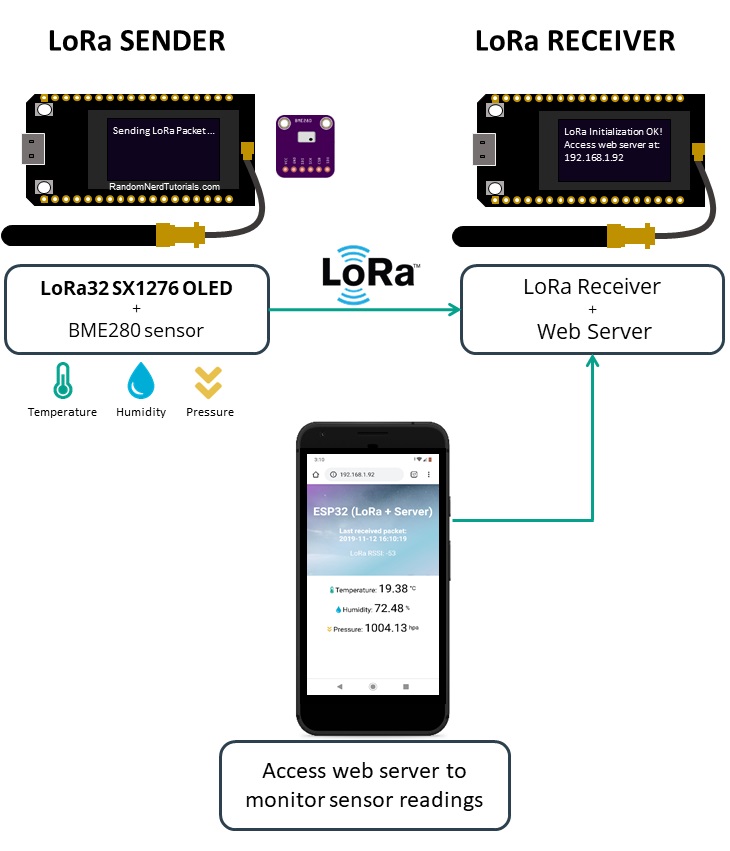
Cụ thể như sau:
- Thiết bị gửi LoRa gửi giá trị của cảm biến BME280 qua đài LoRa (tần suất 10 giây 1 lần)
- Thiết bị nhận LoRa nhận thông tin và hiển thị trên Web Server
- Bạn có thể giám sát thông tin nhận được từ cảm biến bằng cách vào Web Server để xem
- Thiết bị gửi và nhận LoRa có thể cách xa nhau vài trăm mét. Do đó, bạn có thể sử dụng dự án LoRa ESP32 Arduino này để theo dõi số liệu từ cánh đồng trồng trọt của mình, nếu nhà bạn chỉ cách đó vài trăm mét.
- Thiết bị nhận LoRa hoạt động trên một máy chủ Web không đồng bộ, và các file của Website được lưu trên ESP32 filesystem (SPIFFS)
- Thiết bị nhận LoRa cũng hiển thị ngày và giờ nhận được dữ liệu gần nhất. Để có dữ liệu thời gian này, chúng ta sử dụng đến giao thức NTP trên ESP32
Chuẩn bị
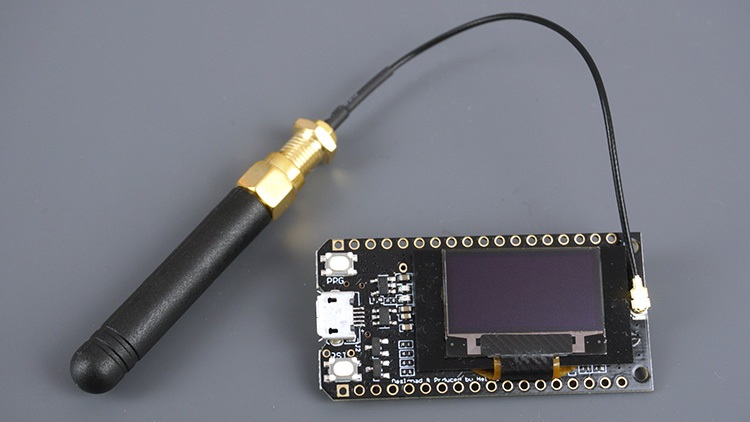
- Mạch TTGO LoRa32 SX1276 OLED: Đây là mạch ESP32 tích hợp OLED và LoRa, bạn có thể sử dụng các mạch ESP32 tương tự tại đây
- Cảm biến nhiệt độ, độ ẩm và áp suất BME280. Tuy nhiên bạn có thể sử dụng các cảm biến khác tùy thích
Cài đặt thư viện trên Arduino IDE
Trước khi cài thư viện, bạn cần phải cài đặt gói ESP32 trong phần mềm Arduino IDE của mình, để có thể làm việc với mạch này. Nếu chưa cài, bạn xem hướng dẫn bên dưới, nếu đã cài, bạn bỏ qua bước này và trực tiếp kéo xuống phần cài thư viện.
Cách lập trình ESP32 bằng Arduino IDE (Windows, Linux, Mac OS X)
Thư viện OLED, BME280 và LoRa
Bạn có thể cài đặt 3 thư viện trên thông qua trình quản lý thư viện có sẵn trong Arduino IDE, bằng cách truy cập Sketch > Include Library> Manage Libraries và tìm kiếm tên 3 thư viện sau:
- Thư viện LoRa: arduino-LoRa library by sandeep mistry
- Thư viện OLED: Adafruit_SSD1306 library and Adafruit_GFX library
- Thư viện BME280: Adafruit_BME280 library and Adafruit unified sensor library
Thư viện Web không đồng bộ (Asynchronous Web Server)
Bạn cần cài đặt 2 thư viện sau:
2 thư viện trên không có sẵn trong trình quản lý thư viện của Arduino IDE, do đó, bạn cần tải chúng trực tiếp qua link mình đã gắn bên trên, sau đó giải nén và di chuyển chúng vào thư mục thư viện của Arduino.
Sau đó, bạn mở Sketch > Include Library > Add .ZIP library… và chọn thư mục bạn vừa tải về.
Thư viện NTPClient
Mỗi khi thiết bị nhận LoRa nhận một tin nhắn mới, chúng sẽ yêu cầu ngày và giờ từ NTP Server để biết thời gian nhận tin là khi nào.
Để thực hiện được điều đó, trong dự án LoRa ESP32 Arduino lần này, chúng ta sẽ sử dụng thư viện NTPClient. Tương tự, thư viện này không có sẵn trong trình quản lý, nên bạn cần tải file về máy, giải nén và di chuyển vào thư mục thư viện:
Làm việc với thiết bị gửi LoRa
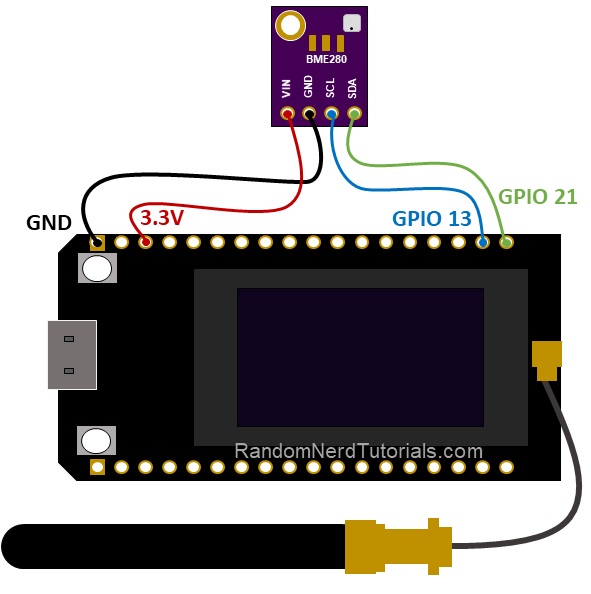
Thiết bị gửi LoRa được kết nối với cảm biến BME280. Chúng có vai trò gửi dữ liệu nhiệt độ, độ ẩm và áp suất sau mỗi 10 giây, bạn có thể thay đổi tần suất này tùy thích thông qua đoạn code.
Kết nối thiết bị
Code
//Libraries for LoRa
#include <SPI.h>
#include <LoRa.h>

//Libraries for OLED Display
#include <Wire.h>
#include <Adafruit_GFX.h>
#include <Adafruit_SSD1306.h>

//Libraries for BME280
#include <Adafruit_Sensor.h>
#include <Adafruit_BME280.h>

//define the pins used by the LoRa transceiver module
#define SCK 5
#define MISO 19
#define MOSI 27
#define SS 18
#define RST 14
#define DIO0 26

//433E6 for Asia
//866E6 for Europe
//915E6 for North America
#define BAND 866E6

//OLED pins
#define OLED_SDA 4
#define OLED_SCL 15
#define OLED_RST 16
#define SCREEN_WIDTH 128 // OLED display width, in pixels
#define SCREEN_HEIGHT 64 // OLED display height, in pixels

//BME280 definition
#define SDA 21
#define SCL 13

TwoWire I2Cone = TwoWire(1);
Adafruit_BME280 bme;

//packet counter
int readingID = 0;

int counter = 0;
String LoRaMessage = "";

float temperature = 0;
float humidity = 0;
float pressure = 0;

Adafruit_SSD1306 display(SCREEN_WIDTH, SCREEN_HEIGHT, &Wire, OLED_RST);

//Initialize OLED display
void startOLED(){
  //reset OLED display via software
  pinMode(OLED_RST, OUTPUT);
  digitalWrite(OLED_RST, LOW);
  delay(20);
  digitalWrite(OLED_RST, HIGH);

  //initialize OLED
  Wire.begin(OLED_SDA, OLED_SCL);
  if(!display.begin(SSD1306_SWITCHCAPVCC, 0x3c, false, false)) { // Address 0x3C for 128x32
    Serial.println(F("SSD1306 allocation failed"));
    for(;;); // Don't proceed, loop forever
  }
  display.clearDisplay();
  display.setTextColor(WHITE);
  display.setTextSize(1);
  display.setCursor(0,0);
  display.print("LORA SENDER");
}

//Initialize LoRa module
void startLoRA(){
  //SPI LoRa pins
  SPI.begin(SCK, MISO, MOSI, SS);
  //setup LoRa transceiver module
  LoRa.setPins(SS, RST, DIO0);

  while (!LoRa.begin(BAND) && counter < 10) {
    Serial.print(".");
    counter++;
    delay(500);
  }
  if (counter == 10) {
    // Increment readingID on every new reading
    readingID++;
    Serial.println("Starting LoRa failed!");
  }
  Serial.println("LoRa Initialization OK!");
  display.setCursor(0,10);
  display.clearDisplay();
  display.print("LoRa Initializing OK!");
  display.display();
  delay(2000);
}

void startBME(){
  I2Cone.begin(SDA, SCL, 100000);
  bool status1 = bme.begin(0x76, &I2Cone);
  if (!status1) {
    Serial.println("Could not find a valid BME280_1 sensor, check wiring!");
    while (1);
  }
}

void getReadings(){
  temperature = bme.readTemperature();
  humidity = bme.readHumidity();
  pressure = bme.readPressure() / 100.0F;
}

void sendReadings() {
  LoRaMessage = String(readingID) + "/" + String(temperature) + "&" + String(humidity) + "#" + String(pressure);
  //Send LoRa packet to receiver
  LoRa.beginPacket();
  LoRa.print(LoRaMessage);
  LoRa.endPacket();

  display.clearDisplay();
  display.setCursor(0,0);
  display.setTextSize(1);
  display.print("LoRa packet sent!");
  display.setCursor(0,20);
  display.print("Temperature:");
  display.setCursor(72,20);
  display.print(temperature);
  display.setCursor(0,30);
  display.print("Humidity:");
  display.setCursor(54,30);
  display.print(humidity);
  display.setCursor(0,40);
  display.print("Pressure:");
  display.setCursor(54,40);
  display.print(pressure);
  display.setCursor(0,50);
  display.print("Reading ID:");
  display.setCursor(66,50);
  display.print(readingID);
  display.display();
  Serial.print("Sending packet: ");
  Serial.println(readingID);
  readingID++;
}

void setup() {
  //initialize Serial Monitor
  Serial.begin(115200);
  startOLED();
  startBME();
  startLoRA();
}
void loop() {
  getReadings();
  sendReadings();
  delay(10000);
}
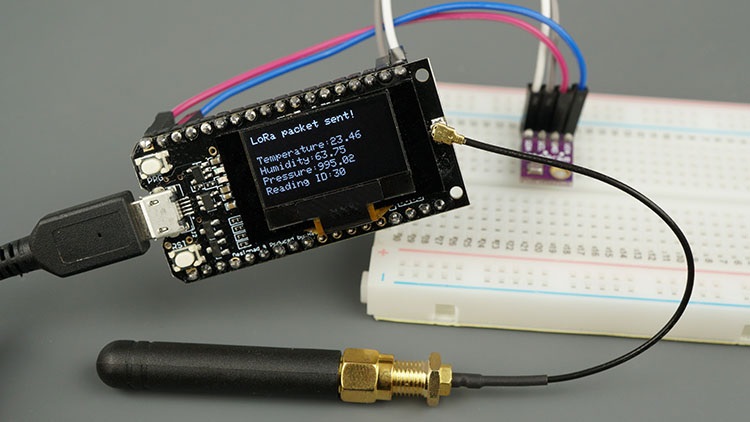
Sau khi nạp code trên vào mạch, bạn sẽ nhận được các thông tin mới nhất từ cảm biến lên màn hình OLED:
Thiết bị thu LoRa
Thiết bị thu LoRa sẽ nhận các thông tin từ thiết bị gửi LoRa, và hiển thị chúng trên Web Server. Ngoài giá trị từ cảm biến, chúng ta cũng sẽ hiển thị thời gian nhận các chỉ số đó và RSSI (received signal strength indicator – thông số về cường độ tín hiệu đã nhận).
Dưới đây là hình minh họa về Web Server mà chúng ta xây dựng:
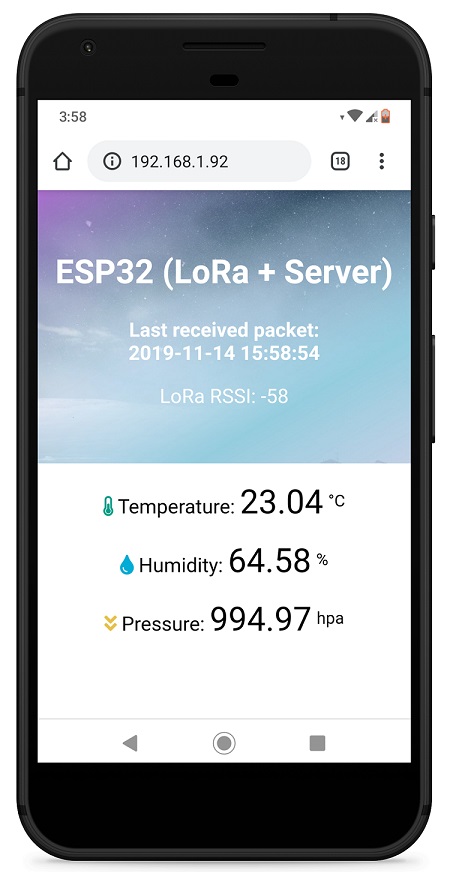
Như bạn thấy, chúng ta sẽ tạo hình nền và các icon trang trí, phân tầng giữa heading và text thường để trang Web trông đẹp mắt và dễ theo dõi hơn.
Có nhiều cách khác nhau để hiển thị hình ảnh trên máy chủ Web. Trong dự án LoRa ESP32 Arduino này, IoTZone sẽ lưu trữ hệ thống trên hệ thống tệp của ESP32 (SPIFFS). Chúng ta cũng sẽ lưu trữ file HTML trên SPIFFS.
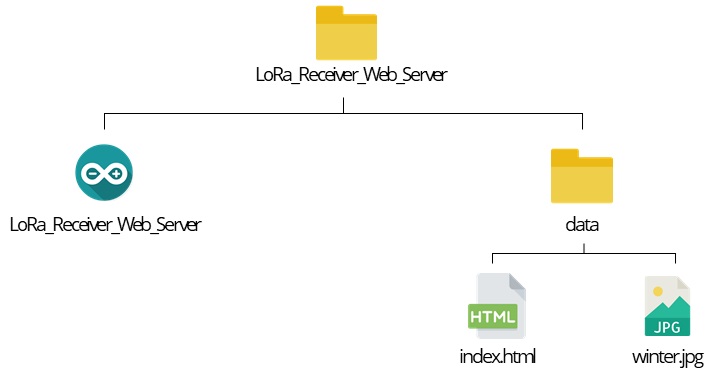
Sắp xếp file của bạn
Để xây dựng Web Server, bạn cần 3 file:
- Sketch trong Arduino
- File HTML
- File hình ảnh
File HTML và hình ảnh phải được lưu trong thư mục có tên data bên trong thư mục Arduino sketch, như hình minh họa:
Tạo file HTML
Bạn cần tạo 1 file index.html có nội dung sau:
<!DOCTYPE HTML><html>
<head>
<meta name="viewport" content="width=device-width, initial-scale=1">
<link rel="icon" href="data:,">
<title>ESP32 (LoRa + Server)</title>
<link rel="stylesheet" href="https://use.fontawesome.com/releases/v5.7.2/css/all.css" integrity="sha384-fnmOCqbTlWIlj8LyTjo7mOUStjsKC4pOpQbqyi7RrhN7udi9RwhKkMHpvLbHG9Sr" crossorigin="anonymous">
<style>
body {
margin: 0;
font-family: Arial, Helvetica, sans-serif;
text-align: center;
}
header {
margin: 0;
padding-top: 5vh;
padding-bottom: 5vh;
overflow: hidden;
background-image: url(winter);
background-size: cover;
color: white;
}
h2 {
font-size: 2.0rem;
}
p { font-size: 1.2rem; }
.units { font-size: 1.2rem; }
.readings { font-size: 2.0rem; }
</style>
</head>
<body>
<header>
<h2>ESP32 (LoRa + Server)</h2>
<p><strong>Last received packet:<br/><span id="timestamp">%TIMESTAMP%</span></strong></p>
<p>LoRa RSSI: <span id="rssi">%RSSI%</span></p>
</header>
<main>
<p>
<i class="fas fa-thermometer-half" style="color:#059e8a;"></i> Temperature: <span id="temperature" class="readings">%TEMPERATURE%</span>
<sup>°C</sup>
</p>
<p>
<i class="fas fa-tint" style="color:#00add6;"></i> Humidity: <span id="humidity" class="readings">%HUMIDITY%</span>
<sup>%</sup>
</p>
<p>
<i class="fas fa-angle-double-down" style="color:#e8c14d;"></i> Pressure: <span id="pressure" class="readings">%PRESSURE%</span>
<sup>hpa</sup>
</p>
</main>
<script>
setInterval(updateValues, 10000, "temperature");
setInterval(updateValues, 10000, "humidity");
setInterval(updateValues, 10000, "pressure");
setInterval(updateValues, 10000, "rssi");
setInterval(updateValues, 10000, "timestamp");
function updateValues(value) {
var xhttp = new XMLHttpRequest();
xhttp.onreadystatechange = function() {
if (this.readyState == 4 && this.status == 200) {
document.getElementById(value).innerHTML = this.responseText;
}
};
xhttp.open("GET", "/" + value, true);
xhttp.send();
}
</script>
</body>
</html>
Mình cũng đưa các style CSS vào trong file HTML trên, cũng như có thêm các đoạn JavaScropt để hệ thống web tự cập nhật các giá trị từ cảm biến.
Một phần quan trọng bạn cần lưu ý là placeholders (phần giữ chỗ), đây là những phần được đặt giữa các dấu %, ví dụ như %TIMESTAMP%, %TEMPERATURE%, %HUMIDITY%, %PRESSURE% và %RSSI%. Các phần giữa chỗ này sẽ được thay thế thực tế bằng code trong Arduino.
Các style được thêm vào giữa các thẻ <style> và <style>:
<style>
  body {
    margin: 0;
    font-family: Arial, Helvetica, sans-serif;
    text-align: center;
  }
  header {
    margin: 0;
    padding-top: 10vh;
    padding-bottom: 5vh;
    overflow: hidden;
    width: 100%;
    background-image: url(winter.jpg);
    background-size: cover;
    color: white;
  }
  h2 {
    font-size: 2.0rem;
  }
  p { font-size: 1.2rem; }
  .units { font-size: 1.2rem; }
  .readings { font-size: 2.0rem; }
</style>
Nếu bạn muốn chọn 1 hình nền khác cho Web Server, bạn chỉ cần sửa đổi dòng sau (thay đổi tên hình ảnh thành hình bạn muốn). Như hiện tại tên hình ảnh đang là winter.jpg:
background-image: url(winter.jpg);
Đoạn JavaScript được nằm giữa các thẻ <script> và <script>:
<script>
setInterval(updateValues("temperature"), 5000);
setInterval(updateValues("humidity"), 5000);
setInterval(updateValues("pressure"), 5000);
setInterval(updateValues("rssi"), 5000);
setInterval(updateValues("timeAndDate"), 5000);

function updateValues(value) {
  console.log(value);
  var xhttp = new XMLHttpRequest();
  xhttp.onreadystatechange = function() {
    if (this.readyState == 4 && this.status == 200) {
      document.getElementById(value).innerHTML = this.responseText;
    }
  };
  xhttp.open("GET", "/" + value, true);
  xhttp.send();
}
</script>
Code trên thiết bị thu LoRa:
// Import Wi-Fi library
#include <WiFi.h>
#include "ESPAsyncWebServer.h"

#include <SPIFFS.h>

//Libraries for LoRa
#include <SPI.h>
#include <LoRa.h>

//Libraries for OLED Display
#include <Wire.h>
#include <Adafruit_GFX.h>
#include <Adafruit_SSD1306.h>

// Libraries to get time from NTP Server
#include <NTPClient.h>
#include <WiFiUdp.h>

//define the pins used by the LoRa transceiver module
#define SCK 5
#define MISO 19
#define MOSI 27
#define SS 18
#define RST 14
#define DIO0 26

//433E6 for Asia
//866E6 for Europe
//915E6 for North America
#define BAND 866E6

//OLED pins
#define OLED_SDA 4
#define OLED_SCL 15
#define OLED_RST 16
#define SCREEN_WIDTH 128 // OLED display width, in pixels
#define SCREEN_HEIGHT 64 // OLED display height, in pixels

// Replace with your network credentials
const char* ssid     = "REPLACE_WITH_YOUR_SSID";
const char* password = "REPLACE_WITH_YOUR_PASSWORD";

// Define NTP Client to get time
WiFiUDP ntpUDP;
NTPClient timeClient(ntpUDP);

// Variables to save date and time
String formattedDate;
String day;
String hour;
String timestamp;


// Initialize variables to get and save LoRa data
int rssi;
String loRaMessage;
String temperature;
String humidity;
String pressure;
String readingID;

// Create AsyncWebServer object on port 80
AsyncWebServer server(80);

Adafruit_SSD1306 display(SCREEN_WIDTH, SCREEN_HEIGHT, &Wire, OLED_RST);

// Replaces placeholder with DHT values
String processor(const String& var){
  //Serial.println(var);
  if(var == "TEMPERATURE"){
    return temperature;
  }
  else if(var == "HUMIDITY"){
    return humidity;
  }
  else if(var == "PRESSURE"){
    return pressure;
  }
  else if(var == "TIMESTAMP"){
    return timestamp;
  }
  else if (var == "RRSI"){
    return String(rssi);
  }
  return String();
}

//Initialize OLED display
void startOLED(){
  //reset OLED display via software
  pinMode(OLED_RST, OUTPUT);
  digitalWrite(OLED_RST, LOW);
  delay(20);
  digitalWrite(OLED_RST, HIGH);

  //initialize OLED
  Wire.begin(OLED_SDA, OLED_SCL);
  if(!display.begin(SSD1306_SWITCHCAPVCC, 0x3c, false, false)) { // Address 0x3C for 128x32
    Serial.println(F("SSD1306 allocation failed"));
    for(;;); // Don't proceed, loop forever
  }
  display.clearDisplay();
  display.setTextColor(WHITE);
  display.setTextSize(1);
  display.setCursor(0,0);
  display.print("LORA SENDER");
}

//Initialize LoRa module
void startLoRA(){
  int counter;
  //SPI LoRa pins
  SPI.begin(SCK, MISO, MOSI, SS);
  //setup LoRa transceiver module
  LoRa.setPins(SS, RST, DIO0);

  while (!LoRa.begin(BAND) && counter < 10) {
    Serial.print(".");
    counter++;
    delay(500);
  }
  if (counter == 10) {
    // Increment readingID on every new reading
    Serial.println("Starting LoRa failed!");
  }
  Serial.println("LoRa Initialization OK!");
  display.setCursor(0,10);
  display.clearDisplay();
  display.print("LoRa Initializing OK!");
  display.display();
  delay(2000);
}

void connectWiFi(){
  // Connect to Wi-Fi network with SSID and password
  Serial.print("Connecting to ");
  Serial.println(ssid);
  WiFi.begin(ssid, password);
  while (WiFi.status() != WL_CONNECTED) {
    delay(500);
    Serial.print(".");
  }
  // Print local IP address and start web server
  Serial.println("");
  Serial.println("WiFi connected.");
  Serial.println("IP address: ");
  Serial.println(WiFi.localIP());
  display.setCursor(0,20);
  display.print("Access web server at: ");
  display.setCursor(0,30);
  display.print(WiFi.localIP());
  display.display();
}

// Read LoRa packet and get the sensor readings
void getLoRaData() {
  Serial.print("Lora packet received: ");
  // Read packet
  while (LoRa.available()) {
    String LoRaData = LoRa.readString();
    // LoRaData format: readingID/temperature&soilMoisture#batterylevel
    // String example: 1/27.43&654#95.34
    Serial.print(LoRaData);

    // Get readingID, temperature and soil moisture
    int pos1 = LoRaData.indexOf('/');
    int pos2 = LoRaData.indexOf('&');
    int pos3 = LoRaData.indexOf('#');
    readingID = LoRaData.substring(0, pos1);
    temperature = LoRaData.substring(pos1 +1, pos2);
    humidity = LoRaData.substring(pos2+1, pos3);
    pressure = LoRaData.substring(pos3+1, LoRaData.length());
  }
  // Get RSSI
  rssi = LoRa.packetRssi();
  Serial.print(" with RSSI ");
  Serial.println(rssi);
}

// Function to get date and time from NTPClient
void getTimeStamp() {
  while(!timeClient.update()) {
    timeClient.forceUpdate();
  }
  // The formattedDate comes with the following format:
  // 2018-05-28T16:00:13Z
  // We need to extract date and time
  formattedDate = timeClient.getFormattedDate();
  Serial.println(formattedDate);

  // Extract date
  int splitT = formattedDate.indexOf("T");
  day = formattedDate.substring(0, splitT);
  Serial.println(day);
  // Extract time
  hour = formattedDate.substring(splitT+1, formattedDate.length()-1);
  Serial.println(hour);
  timestamp = day + " " + hour;
}

void setup() {
  // Initialize Serial Monitor
  Serial.begin(115200);
  startOLED();
  startLoRA();
  connectWiFi();

  if(!SPIFFS.begin()){
    Serial.println("An Error has occurred while mounting SPIFFS");
    return;
  }
  // Route for root / web page
  server.on("/", HTTP_GET, [](AsyncWebServerRequest *request){
    request->send(SPIFFS, "/index.html", String(), false, processor);
  });
  server.on("/temperature", HTTP_GET, [](AsyncWebServerRequest *request){
    request->send_P(200, "text/plain", temperature.c_str());
  });
  server.on("/humidity", HTTP_GET, [](AsyncWebServerRequest *request){
    request->send_P(200, "text/plain", humidity.c_str());
  });
  server.on("/pressure", HTTP_GET, [](AsyncWebServerRequest *request){
    request->send_P(200, "text/plain", pressure.c_str());
  });
  server.on("/timestamp", HTTP_GET, [](AsyncWebServerRequest *request){
    request->send_P(200, "text/plain", timestamp.c_str());
  });
  server.on("/rssi", HTTP_GET, [](AsyncWebServerRequest *request){
    request->send_P(200, "text/plain", String(rssi).c_str());
  });
  server.on("/winter", HTTP_GET, [](AsyncWebServerRequest *request){
    request->send(SPIFFS, "/winter.jpg", "image/jpg");
  });
  // Start server
  server.begin();

  // Initialize a NTPClient to get time
  timeClient.begin();
  // Set offset time in seconds to adjust for your timezone, for example:
  // GMT +1 = 3600
  // GMT +8 = 28800
  // GMT -1 = -3600
  // GMT 0 = 0
  timeClient.setTimeOffset(0);
}

void loop() {
  // Check if there are LoRa packets available
  int packetSize = LoRa.parsePacket();
  if (packetSize) {
    getLoRaData();
    getTimeStamp();
  }
}
Bây giờ, bạn hãy chèn thông tin mạng WiFi của bạn và lưu bản code này lại. Sau đó, trong Arrduino IDE, bạn mở Sketch >> Show Sketch Folder và tạo 1 thư mục có tên là data. Trong thư mục đó, bạn lưu các file HTML và hình ảnh cần dùng cho Web Server nhé!
Sau khi chọn lưu tất cả các file cần thiết, bạn hãy chọn Tool >> ESP32 Data Sketch Upload. Sau vài giây, các file sẽ được tải lên SPIFFS thành công.
Lưu ý: Nếu không chọn được tùy chọn ESP32 Data Sketch Upload, điều đó có nghĩa là bạn chưa cài đặt plugin hỗ trợ. Tham khảo hướng dẫn cài plugin SPIFFS).
Bây giờ, bạn nạp code vào ESP32 của mình, mở Serial Monitor ở tốc độ 115200 để quan sát cách dự án LoRa ESP32 Arduino hoạt động nhé! Bạn cũng có thể mở Web Server thông qua địa chỉ IP của mạch ESP32 để giám sát thông tin từ xa.
Chúc bạn thành công!