Bạn đang cần tài liệu tham khảo làm đồ án hệ thống tưới nước thông minh? Bài viết này sẽ hướng dẫn bạn chi tiết cách thực hiện dự án này, tích hợp công nghệ Internet of Things qua mạch ESP32 và Blynk App.
Đây là hệ thống hoàn toàn tự động, với các cảm biến: độ ẩm đất, mực nước, nhiệt độ độ ẩm DHT22 và Relay:
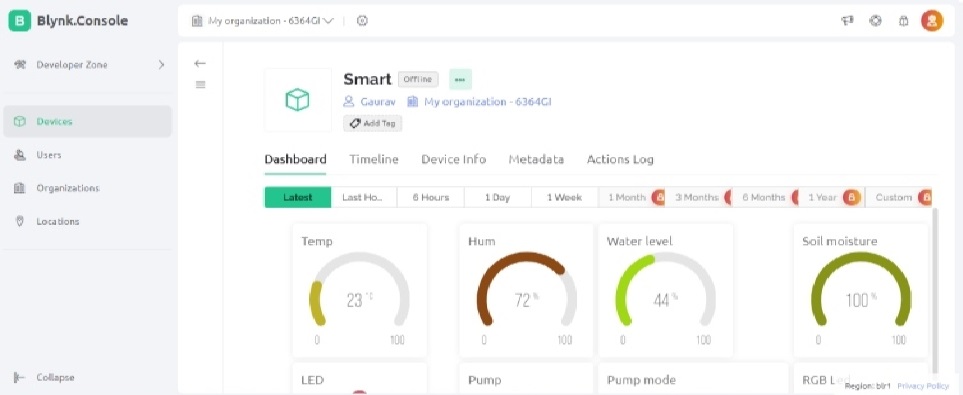
- Hệ thống sẽ gửi toàn bộ các dữ liệu này đến ứng dụng Blynk App trên điện thoại để chúng ta tiện theo dõi.
- Tùy thuộc điều kiện của đất (như độ ẩm, nhiệt độ,…) mà hệ thống sẽ tự động bật hoặc tắt máy bơm.
Dự án tưới nước này khá phù hợp với các trang trại.
Cách hoạt động của đồ án hệ thống tưới nước thông minh với ESP32
Các thiết bị dùng trong dự án và tác dụng:
- Cảm biến độ ẩm đất điện dung: đo độ ẩm đất (Bạn cũng có thể sử dụng loại cảm biến điện trở khác tùy thích).
- Cảm biến mực nước: Đo mực nước trong bể chứa.
- Cảm biến DHT22: Đo nhiệt độ và độ ẩm.
- Relay 5V: Dùng để điều khiển máy bơm nước.
Khi chúng ta bật hệ thống này, hệ thống sẽ kết nối ESP32 và Blynk App thông qua Internet.
Sau đó, các giá trị đo được từ cảm biến sẽ hiển thị lên ứng dụng Blynk.
Cách hệ thống tự động tưới nước:
- Mỗi khi phát hiện độ ẩm đất thấp (dưới 50%), động cơ bơm nước sẽ tự động bật để tưới nước cho cây.
- Trong trường hợp cảm biến mực nước phát hiện bể chứa thiếu nước (dưới 20%) thì động cơ bơm nước sẽ không bật.
- Khi tưới tới khi đất ước (độ ẩm trên 50%), thì máy bơm sẽ tắt.
Ngoài ra, trên ứng dụng Blynk cũng có sẵn nhiều nút để chúng ta bật và tắt máy bơm ở chế độ thủ công. Bạn có thể theo dõi thông tin của khu vườn của mình tại bất kỳ đâu, miễn là có điện thoại và Internet.
Chuẩn bị phần cứng
- Mạch ESP32 (bạn có thể mua mạch ESP32 phù hợp tại đây)
- Cảm biến độ ẩm đất điện dung
- Cảm biến nhiệt độ độ ẩm DHT22
- Cảm biến mực nước
- Máy bơm mini
- Ống bơm nước
- Pin 3.7V
- Dây kết nối
- Dây đèn LED RGB 5V
Sơ đồ kết nối
Dưới đây là hình ảnh minh họa cách kết nối cho đồ án hệ thống tưới nước thông minh, sử dụng ESP32 và Blynk App:
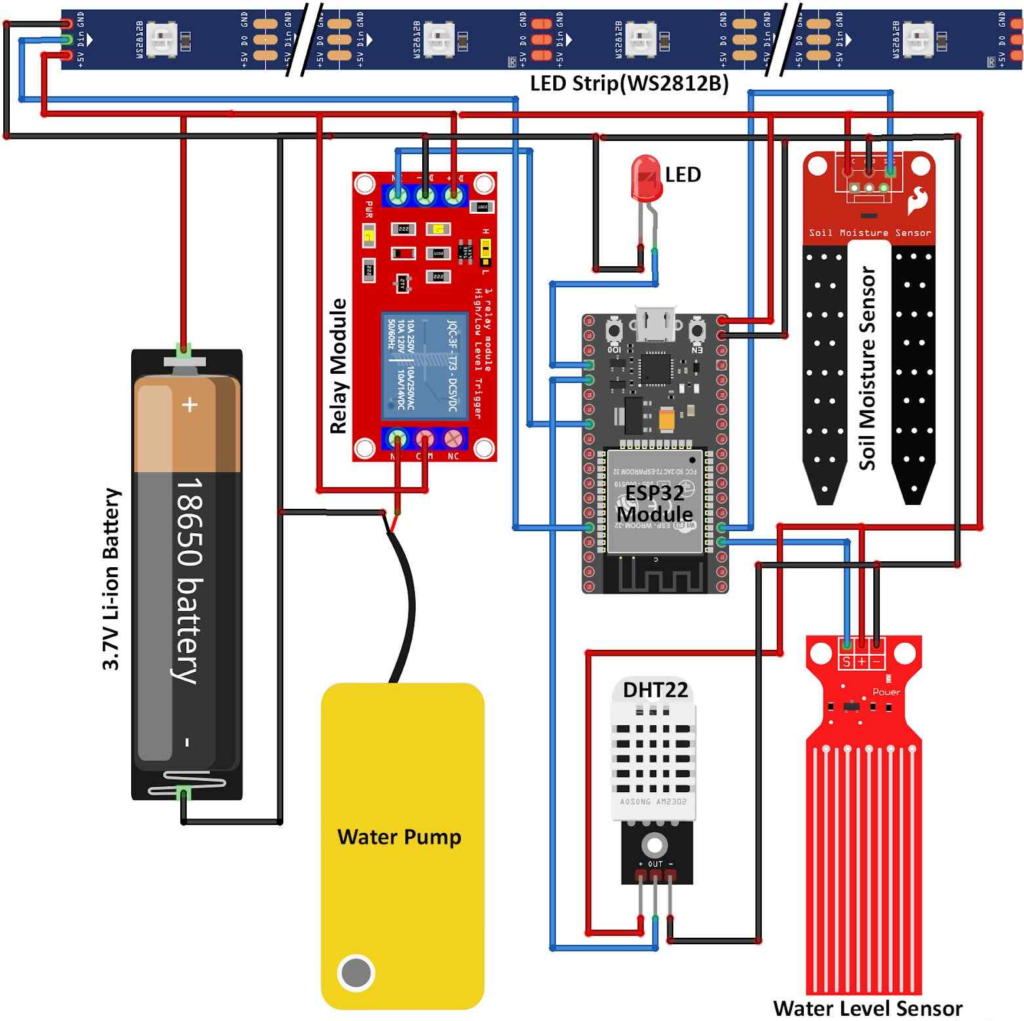
Cụ thể cách kết nối:
- Cảm biến độ ẩm đất: Chân D35 của ESP32
- Cảm biến mực nước: Chân D34 của ESP32
- Động cơ: Kết nối với Relay
- Relay: Chân D5 của ESP32.
- Dải đèn LED RGB: Chân D21 của ESP32.
Chúng ta có thể cấp nguồn cho động cơ và Relay với nguồn 3.7V từ pin Li-ion, còn các cảm biến khác thì chỉ cần nguồn cấp 3.3V.
Cài đặt Blynk App
Đầu tiên, bạn cần tải ứng dụng Blynk App trên điện thoại. Sau đó, bạn mở app và tiến hành đăng nhập vào tài khoản của mình (nếu chưa có thì bạn cần tạo 1 tài khoản mới). Nếu dùng phiên bản Web, bạn truy cập vào https://blynk.io và thực hiện tương tự.
Để tạo template mới, bạn hãy mở Developer Zone ở munu bên trái, click vào my Temples và chọn New Template:

Tại minu Widget, bạn có thể thêm các Widget Button điều khiển và các Gauges tùy thích vào giao diện, chọn Virtual Pin là V0. Sau đó thay đổi giá trị từ 1 thành 0 và thay đổi chế độ khi Gauge thay đổi giá trị đầu vào từ 0 – 100. Cuối cùng, bạn có thể tùy chỉnh các tiện ích này theo ý thích.
Tại Device Info, bạn tìm kiếm thông tin Template ID, Template Name, và AuthToken. Bạn hãy lưu các thông tin này lại để lưu vào đoạn code của đồ án hệ thống tưới nước thông minh này bên dưới nhé!
Cách lập trình
Vì hệ thống của chúng ta sử dụng nhiều module khác nhau, nên chúng ta cần cài thư viện để hỗ trợ làm việc với từng module này.
Bạn hãy mở Arduino IDE và cài các thư viện sau qua đường link mà mình đã gắn kèm:
Sau khi cài xong, chúng ta cùng lập trình cho đồ án hệ thống tưới nước thông minh ESP32 này nào!
Đầu tiên, bạn hãy khai báo các thông tin Template ID, Template Name, và AuthToken mà bạn đã lấy trong Blynk App trước đó:
#define BLYNK_TEMPLATE_ID   "Thay thế BLYNK_TEMPLATE_ID của bạn ở đây"
#define BLYNK_TEMPLATE_NAME "Thay thế your BLYNK_TEMPLATE_NAME của bạn ở đây"
#define BLYNK_AUTH_TOKEN    "Thay thế your BLYNK_AUTH_TOKEN của bạn ở đây"
#define BLYNK_PRINT Serial
Khai báo các thư viện cần dùng và các thông tin xác thực WiFi:
#include <WiFi.h>
#include <BlynkSimpleEsp32.h>
#include "DHT.h"
#include <FastLED.h>
char auth[] = BLYNK_AUTH_TOKEN;
char ssid[] = "Tên WiFi của bạn";
char pass[] = "Mật khẩu WiFi của bạn";
Xác định cấu hình của chuỗi đèn LED, chẳng hạn như chân kết nối, độ sáng, thứ tự, bố cục:
#define LED_PIN     21
#define BRIGHTNESS  255
#define LED_TYPE    WS2811
#define COLOR_ORDER GRB

const uint8_t kMatrixWidth  = 16;
const uint8_t kMatrixHeight = 16;
const bool    kMatrixSerpentineLayout = true;
Xác định cấu hình cho cảm biến DHT và khai báo chân cắm của các cảm biến độ ẩm đất, mực nước, đèn LED:
#define DHTPIN 4
#define DHTTYPE DHT22

DHT dht(DHTPIN, DHTTYPE);
const int soilMoisturePin = 35; // Analog pin for the soil moisture sensor
const int waterLevelPin = 34;   // Analog pin for the water level sensor
const int ledPin = 2;
Đặt ngưỡng cho độ ẩm đất, máy bơm và các biến liên quan đến việc tự động bật tắt máy bơm trong Đồ án hệ thống tưới nước thông minh sử dụng ESP32 và Blynk App này:
const int SOIL_MOISTURE_LOW = 50;  // Adjusted to match the 0-100 range
const int SOIL_MOISTURE_HIGH = 50; // Adjusted to match the 0-100 range

const int pumpPin = 5;  // Change this to the actual pin connected to the DC pump on ESP32
int pumpState = LOW;    // Initialize pumpState to LOW (off)
int pumpMode = 0;       // 0 for automatic, 1 for manual

int waterLevel = 0;     // Water level indicator value
unsigned long previousMillis = 0;
const unsigned long interval = 1000; // Interval in milliseconds
Tạo giao tiếp Serial Monitor, chân đầu ra, kết nối giữa ESP32 và Blynk App và ma trận LED:
void setup() {
  Serial.begin(115200);
  digitalWrite(pumpPin,LOW);
  pinMode(ledPin, OUTPUT);
  pinMode(pumpPin, OUTPUT);
  dht.begin();
  Blynk.begin(auth, ssid, pass);
  Blynk.virtualWrite(V2, LOW);
  Blynk.virtualWrite(V3, "LED OFF");
  Blynk.virtualWrite(V6, LOW); // Initialize the mode button to automatic mode
  Blynk.virtualWrite(V5, LOW); // Initialize the pump button to OFF and On
  Blynk.virtualWrite(V8, LOW); // Initialize the RGB Led Strip button to OFF And On
  delay(3000);
  LEDS.addLeds<LED_TYPE,LED_PIN,COLOR_ORDER>(leds,80);
  LEDS.setBrightness(BRIGHTNESS);
}
Xây dựng các tính năng tự động trong dự án và các tính năng nhấn nút trên Blynk App để điều khiển:
BLYNK_WRITE(V5) { // This function is called when the pump button state changes (Manual Control)
  if (pumpMode == 1) { // Check if the mode is manual
    pumpState = param.asInt(); // Read the state of the pump button (0 for OFF, 1 for ON)
    digitalWrite(pumpPin, pumpState); // Turn the pump on or off based on button state
  }
}

BLYNK_WRITE(V6) { // This function is called when the mode button state changes
  pumpMode = param.asInt(); // Read the state of the mode button (0 for automatic, 1 for manual)
}

BLYNK_WRITE(V8) {
  int value = param.asInt();
  if (value == 1) {
    // Turn on the LED strip and start the animation
    ledStripOn = true;
  } else {
    // Turn off the LED strip
    ledStripOn = false;
    // You can also add code to clear the LED strip here if needed
  }
}
Nếu hệ thống đang ở chế độ tự động (pumpMode=0), hệ thống sẽ đọc giá trị độ ẩm thông qua cảm biến, với mức giá trị từ 0 – 100. Chúng ta sẽ dùng hàm autoControlPump để tự động bật tắt máy bơm dựa trên độ ẩm đất:
void loop() {
  Blynk.run();
  timer.run();

  updateLEDStrip();
  unsigned long currentMillis = millis();

  if (currentMillis - previousMillis >= interval) {
    previousMillis = currentMillis;

    // Read soil moisture or water level based on the flag
    if (pumpMode == 0) {
      int soilSensorValue = analogRead(soilMoisturePin);
      Serial.println(soilSensorValue);
      mappedSoilMoisture = map(soilSensorValue, 1023, 2750, 100, 0); // Update mappedSoilMoisture
      autoControlPump(mappedSoilMoisture); // Automatically control the pump based on soil moisture if in automatic mode
    }
Đo mực nước từ cảm biến, nếu mực nước dưới ngưỡng quy định (450), hệ thống sẽ lưu mực nước thành 0. Nếu không, hệ thống sẽ ánh xạ giá trị mực nước trong phạm vi từ 0 – 100:
 // Read water level
    waterLevel = analogRead(waterLevelPin);
    Serial.println(waterLevel);
    if (waterLevel < 450) {
      waterLevel = 0; // Set water level to 0 if below a threshold
    } else {
      waterLevel = map(waterLevel, 1200, 1600, 0, 100); // Map water level to 0-100
    }
Gọi hàm controlLED để điều khiển đèn LED dựa trên độ ẩm của đất. Sau đó, chúng ta gọi hàm readAndSendSensorData để đọc nhiệt độ, độ ẩm và gửi dữ liệu đến ESP32 và Blynk App (kèm cả mực nước):
    // Control LED
    controlLED(mappedSoilMoisture);

    // Read and send sensor data
    readAndSendSensorData();
    Blynk.virtualWrite(V7, waterLevel); // Send water level to Blynk
  }
}
Demo dự án IoT với ESP32 và Blynk App
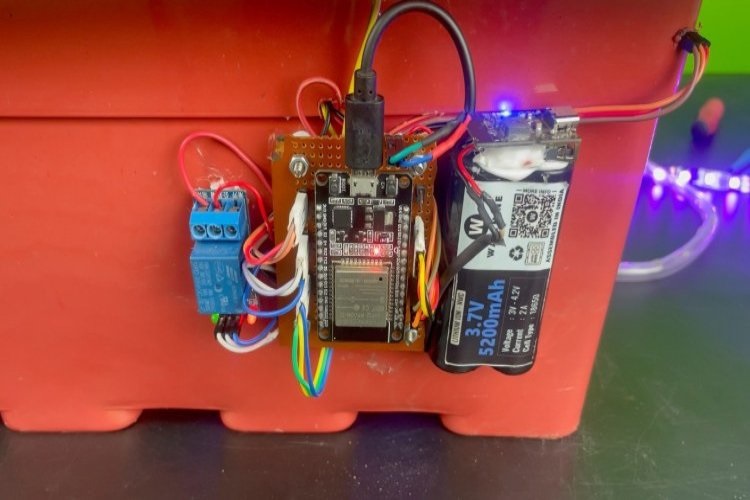
Lưu ý là trong đồ án hệ thống tưới nước thông minh này, mình dùng máy bơm chìm. Do đó, máy bơm được đặt hoàn toàn trong nước và có 1 đường ống để dẫn nước lên khu vực cần tưới.
Bạn hãy nạp code vào ESP32 và mở ứng dụng Blynk, ESP32 sẽ tự động kết nối với WiFi và gửi dữ liệu về ứng dụng Blynk của bạn.
Hãy thử và theo dõi kết quả nhé!
Chương trình hoàn chỉnh
Bạn có thể tham khảo chương trình hoàn chỉnh bên dưới, vui lòng thay đổi các thông tin như mạng WiFi, Templeta ID, Template name,… của bạn trước khi upload code vào ESP32 nhé:
#define BLYNK_TEMPLATE_ID    "Replace your BLYNK_TEMPLATE_ID here"

#define BLYNK_TEMPLATE_NAME  "Replace your BLYNK_TEMPLATE_NAME here"

#define BLYNK_AUTH_TOKEN     "Replace your BLYNK_AUTH_TOKEN here"

#define BLYNK_PRINT Serial


#include <WiFi.h>

#include <BlynkSimpleEsp32.h>

#include "DHT.h"

#include <FastLED.h>


char auth[] = BLYNK_AUTH_TOKEN;

char ssid[] = "Wifi Name";

char pass[] = "Wifi Password";


#define LED_PIN     21

#define BRIGHTNESS  255

#define LED_TYPE    WS2811

#define COLOR_ORDER GRB


const uint8_t kMatrixWidth  = 16;

const uint8_t kMatrixHeight = 16;

const bool    kMatrixSerpentineLayout = true;


#define NUM_LEDS (kMatrixWidth * kMatrixHeight)

#define MAX_DIMENSION ((kMatrixWidth>kMatrixHeight) ? kMatrixWidth : kMatrixHeight)


// The leds

CRGB leds[kMatrixWidth * kMatrixHeight];

BlynkTimer timer;

bool ledStripOn = false;

// The 16 bit version of our coordinates

static uint16_t x;

static uint16_t y;

static uint16_t z;


uint16_t speed = 20; // speed is set dynamically once we've started up

uint16_t scale = 30; // scale is set dynamically once we've started up

uint8_t noise[MAX_DIMENSION][MAX_DIMENSION];


CRGBPalette16 currentPalette( PartyColors_p );

uint8_t       colorLoop = 1;


#define DHTPIN 4

#define DHTTYPE DHT22


DHT dht(DHTPIN, DHTTYPE);

const int soilMoisturePin = 35; // Analog pin for the soil moisture sensor

const int waterLevelPin = 34;   // Analog pin for the water level sensor

const int ledPin = 2;


// Constants for soil moisture thresholds

const int SOIL_MOISTURE_LOW = 50;  // Adjusted to match the 0-100 range

const int SOIL_MOISTURE_HIGH = 50; // Adjusted to match the 0-100 range


const int pumpPin = 5;  // Change this to the actual pin connected to the DC pump on ESP32

int pumpState = LOW;    // Initialize pumpState to LOW (off)

int pumpMode = 0;       // 0 for automatic, 1 for manual


int waterLevel = 0;     // Water level indicator value

unsigned long previousMillis = 0;

const unsigned long interval = 1000; // Interval in milliseconds


float mappedSoilMoisture = 0; // Declare mappedSoilMoisture as a global variable


void setup() {

  Serial.begin(115200);

  digitalWrite(pumpPin,LOW);

  pinMode(ledPin, OUTPUT);

  pinMode(pumpPin, OUTPUT);

  dht.begin();

  Blynk.begin(auth, ssid, pass);

  Blynk.virtualWrite(V2, LOW);

  Blynk.virtualWrite(V3, "LED OFF");

  Blynk.virtualWrite(V6, LOW); // Initialize the mode button to automatic mode

  Blynk.virtualWrite(V5, LOW); // Initialize the pump button to OFF

  Blynk.virtualWrite(V8, LOW); // Initialize the new feature button to OFF

  delay(3000);

  LEDS.addLeds<LED_TYPE,LED_PIN,COLOR_ORDER>(leds,80);

  LEDS.setBrightness(BRIGHTNESS);


  // Initialize our coordinates to some random values

  x = random16();

  y = random16();

  z = random16();

}


BLYNK_WRITE(V5) { // This function is called when the pump button state changes (Manual Control)

  if (pumpMode == 1) { // Check if the mode is manual

    pumpState = param.asInt(); // Read the state of the pump button (0 for OFF, 1 for ON)

    digitalWrite(pumpPin, pumpState); // Turn the pump on or off based on button state

  }

}


BLYNK_WRITE(V6) { // This function is called when the mode button state changes

  pumpMode = param.asInt(); // Read the state of the mode button (0 for automatic, 1 for manual)

}


BLYNK_WRITE(V8) {

  int value = param.asInt();

  if (value == 1) {

    // Turn on the LED strip and start the animation

    ledStripOn = true;

  } else {

    // Turn off the LED strip

    ledStripOn = false;

    // You can also add code to clear the LED strip here if needed

  }

}


// Fill the x/y array of 8-bit noise values using the inoise8 function.

void fillnoise8() {

  // If we're runing at a low "speed", some 8-bit artifacts become visible

  // from frame-to-frame.  In order to reduce this, we can do some fast data-smoothing.

  // The amount of data smoothing we're doing depends on "speed".

  uint8_t dataSmoothing = 0;

  if( speed < 50) {

    dataSmoothing = 200 - (speed * 4);

  }


  for(int i = 0; i < MAX_DIMENSION; i++) {

    int ioffset = scale * i;

    for(int j = 0; j < MAX_DIMENSION; j++) {

      int joffset = scale * j;


      uint8_t data = inoise8(x + ioffset,y + joffset,z);


      // The range of the inoise8 function is roughly 16-238.

      // These two operations expand those values out to roughly 0..255

      // You can comment them out if you want the raw noise data.

      data = qsub8(data,16);

      data = qadd8(data,scale8(data,39));


      if( dataSmoothing ) {

        uint8_t olddata = noise[i][j];

        uint8_t newdata = scale8( olddata, dataSmoothing) + scale8( data, 256 - dataSmoothing);

        data = newdata;

      }


      noise[i][j] = data;

    }

  }


  z += speed;


  // apply slow drift to X and Y, just for visual variation.

  x += speed / 8;

  y -= speed / 16;

}


void mapNoiseToLEDsUsingPalette()

{

  static uint8_t ihue=0;


  for(int i = 0; i < kMatrixWidth; i++) {

    for(int j = 0; j < kMatrixHeight; j++) {

      // We use the value at the (i,j) coordinate in the noise

      // array for our brightness, and the flipped value from (j,i)

      // for our pixel's index into the color palette.


      uint8_t index = noise[j][i];

      uint8_t bri =   noise[i][j];


      // if this palette is a 'loop', add a slowly-changing base value

      if( colorLoop) {

        index += ihue;

      }


      // brighten up, as the color palette itself often contains the

      // light/dark dynamic range desired

      if( bri > 127 ) {

        bri = 255;

      } else {

        bri = dim8_raw( bri * 2);

      }


      CRGB color = ColorFromPalette( currentPalette, index, bri);

      leds[XY(i,j)] = color;

    }

  }


  ihue+=1;

}


void loop() {

  Blynk.run();

  timer.run();


  updateLEDStrip();

  unsigned long currentMillis = millis();


  if (currentMillis - previousMillis >= interval) {

    previousMillis = currentMillis;


    // Read soil moisture or water level based on the flag

    if (pumpMode == 0) {

      int soilSensorValue = analogRead(soilMoisturePin);

      Serial.println(soilSensorValue);

      mappedSoilMoisture = map(soilSensorValue, 1023, 2750, 100, 0); // Update mappedSoilMoisture

      autoControlPump(mappedSoilMoisture); // Automatically control the pump based on soil moisture if in automatic mode

    }


    // Read water level

    waterLevel = analogRead(waterLevelPin);

    Serial.println(waterLevel);

    if (waterLevel < 450) {

      waterLevel = 0; // Set water level to 0 if below a threshold

    } else {

      waterLevel = map(waterLevel, 1200, 1600, 0, 100); // Map water level to 0-100

    }


    // Control LED

    controlLED(mappedSoilMoisture);


    // Read and send sensor data

    readAndSendSensorData();

    Blynk.virtualWrite(V7, waterLevel); // Send water level to Blynk

  }

}


void autoControlPump(float mappedSoilMoisture) {

  if (waterLevel < 30 || waterLevel < 20) {

    // Water level is too low, do not turn on the pump

    pumpState = LOW;

    digitalWrite(ledPin, LOW);

    Blynk.virtualWrite(V2, HIGH);

    Blynk.setProperty(V2, "color", "#D3435C");


  } else if (mappedSoilMoisture <= SOIL_MOISTURE_LOW) {

    // If soil moisture is below the threshold and water level is okay, turn the pump ON

    pumpState = HIGH;

  } else if (mappedSoilMoisture >= SOIL_MOISTURE_HIGH) {

    // If soil moisture is above the threshold, turn the pump OFF

    pumpState = LOW;

  }


  digitalWrite(pumpPin, pumpState); // Update the pump state

  if (pumpMode == 0) {

    Blynk.virtualWrite(V5, pumpState); // Update the pump button status on Blynk

  }

}


void controlLED(float mappedSoilMoisture) {

  if (mappedSoilMoisture <= SOIL_MOISTURE_LOW) {

    digitalWrite(ledPin, HIGH);

    Blynk.virtualWrite(V2, HIGH);

    Blynk.setProperty(V2, "color", "#00FF00");

    Blynk.virtualWrite(V3, "LED ON");

    Blynk.setProperty(V3, "color", "#00FF00");

  } else if (mappedSoilMoisture >= SOIL_MOISTURE_HIGH) {

    digitalWrite(ledPin, LOW);

    Blynk.virtualWrite(V2, HIGH);

    Blynk.setProperty(V2, "color", "#D3435C");

    Blynk.virtualWrite(V3, "LED OFF");

    Blynk.setProperty(V3, "color", "#D3435C");

  }

}


void readAndSendSensorData() {

  float humidity = dht.readHumidity();

  float temperature = dht.readTemperature();


  if (!isnan(humidity) && !isnan(temperature)) {

    Blynk.virtualWrite(V0, temperature);

    Blynk.virtualWrite(V1, humidity);

    Serial.println(temperature);

    Serial.println(humidity);

  } else {

    Serial.println(F("Failed to read from DHT sensor!"));

  }


  if (pumpMode == 0) {

    Blynk.virtualWrite(V4, mappedSoilMoisture); // Update mappedSoilMoisture on Blynk

  }

}


void updateLEDStrip() {

  if (ledStripOn) {

    // Your LED strip animation code here

    // This code will run when the LED strip is turned on

    // Make sure to update the leds array

    // For example, mapNoiseToLEDsUsingPalette();

    ChangePaletteAndSettingsPeriodically();

    fillnoise8(); // Call the noise generation function

    mapNoiseToLEDsUsingPalette(); // Map the noise data to LEDs

    LEDS.show(); // Show the LEDs

    // You may need to adjust the animation speed based on your preference

    delay(10); // Delay between frames (adjust as needed)

  } else {

    // Turn off the LED strip

    // You can also add code to clear the LED strip here if needed

    fill_solid(leds, NUM_LEDS, CRGB::Black);

    LEDS.show();

  }

}

// There are several different palettes of colors demonstrated here.

//

// FastLED provides several 'preset' palettes: RainbowColors_p, RainbowStripeColors_p,

// OceanColors_p, CloudColors_p, LavaColors_p, ForestColors_p, and PartyColors_p.

//

// Additionally, you can manually define your own color palettes, or you can write

// code that creates color palettes on the fly.


// 1 = 5 sec per palette

// 2 = 10 sec per palette

// etc

#define HOLD_PALETTES_X_TIMES_AS_LONG 1


void ChangePaletteAndSettingsPeriodically()

{

  uint8_t secondHand = ((millis() / 1000) / HOLD_PALETTES_X_TIMES_AS_LONG) % 60;

  static uint8_t lastSecond = 99;


  if( lastSecond != secondHand) {

    lastSecond = secondHand;

    if( secondHand ==  0)  { currentPalette = RainbowColors_p;         speed = 20; scale = 30; colorLoop = 1; }

    if( secondHand ==  5)  { SetupPurpleAndGreenPalette();             speed = 10; scale = 50; colorLoop = 1; }

    if( secondHand == 10)  { SetupBlackAndWhiteStripedPalette();       speed = 20; scale = 30; colorLoop = 1; }

    if( secondHand == 15)  { currentPalette = ForestColors_p;          speed =  8; scale =120; colorLoop = 0; }

    if( secondHand == 20)  { currentPalette = CloudColors_p;           speed =  4; scale = 30; colorLoop = 0; }

    if( secondHand == 25)  { currentPalette = LavaColors_p;            speed =  8; scale = 50; colorLoop = 0; }

    if( secondHand == 30)  { currentPalette = OceanColors_p;           speed = 20; scale = 90; colorLoop = 0; }

    if( secondHand == 35)  { currentPalette = PartyColors_p;           speed = 20; scale = 30; colorLoop = 1; }

    if( secondHand == 40)  { SetupRandomPalette();                     speed = 20; scale = 20; colorLoop = 1; }

    if( secondHand == 45)  { SetupRandomPalette();                     speed = 50; scale = 50; colorLoop = 1; }

    if( secondHand == 50)  { SetupRandomPalette();                     speed = 90; scale = 90; colorLoop = 1; }

    if( secondHand == 55)  { currentPalette = RainbowStripeColors_p;   speed = 30; scale = 20; colorLoop = 1; }

  }

}


// This function generates a random palette that's a gradient

// between four different colors.  The first is a dim hue, the second is

// a bright hue, the third is a bright pastel, and the last is

// another bright hue.  This gives some visual bright/dark variation

// which is more interesting than just a gradient of different hues.

void SetupRandomPalette()

{

  currentPalette = CRGBPalette16(

                      CHSV( random8(), 255, 32),

                      CHSV( random8(), 255, 255),

                      CHSV( random8(), 128, 255),

                      CHSV( random8(), 255, 255));

}


// This function sets up a palette of black and white stripes,

// using code.  Since the palette is effectively an array of

// sixteen CRGB colors, the various fill_* functions can be used

// to set them up.

void SetupBlackAndWhiteStripedPalette()

{

  // 'black out' all 16 palette entries...

  fill_solid( currentPalette, 16, CRGB::Black);

  // and set every fourth one to white.

  currentPalette[0] = CRGB::White;

  currentPalette[4] = CRGB::White;

  currentPalette[8] = CRGB::White;

  currentPalette[12] = CRGB::White;


}


// This function sets up a palette of purple and green stripes.

void SetupPurpleAndGreenPalette()

{

  CRGB purple = CHSV( HUE_PURPLE, 255, 255);

  CRGB green  = CHSV( HUE_GREEN, 255, 255);

  CRGB black  = CRGB::Black;


  currentPalette = CRGBPalette16(

    green,  green,  black,  black,

    purple, purple, black,  black,

    green,  green,  black,  black,

    purple, purple, black,  black );

}


//

// Mark's xy coordinate mapping code.  See the XYMatrix for more information on it.

//

uint16_t XY( uint8_t x, uint8_t y)

{

  uint16_t i;

  if( kMatrixSerpentineLayout == false) {

    i = (y * kMatrixWidth) + x;

  }

  if( kMatrixSerpentineLayout == true) {

    if( y & 0x01) {

      // Odd rows run backwards

      uint8_t reverseX = (kMatrixWidth - 1) - x;

      i = (y * kMatrixWidth) + reverseX;

    } else {

      // Even rows run forwards

      i = (y * kMatrixWidth) + x;

    }

  }

  return i;

}
Lời kết
Vậy là mình đã hướng dẫn bạn chi tiết cách thực hiện Đồ án hệ thống tưới nước thông minh với ESP32 trên, chúc bạn thành công! Đừng quên theo dõi tiếp các bài viết hướng dẫn khác trên Website IoTZone nhé, mình có khá nhiều bài viết hướng dẫn khác về chủ đề này.
IoTZone – Chuyên cung cấp thiết bị điện tử & tài liệu cho Makers
- Website: https://iotzone.vn/
- Fanpage: https://www.facebook.com/Iotzonemaker
- SDT: 0364174499
- Zalo: https://zalo.me/0364174499