Điều khiển đổi màu LED RGB ESP32 trên Web Server
Trong dự án này, mình sẽ hướng dẫn bạn làm một bộ điều khiển LED RGB ESP32 bằng Color Picker trên Web Server nhé! Qua đó, chúng ta có thể điều khiển màu sắc của LED RGB theo ý thích từ xa qua Internet.
Tuy nhiên, để dễ theo dõi hướng dẫn dưới đây, bạn có thể tham khảo cách hoạt động của đèn LED RGB và cách tạo Web Server ESP32 trên Arduino nhé:
Mục lục bài viết
ToggleGiới thiệu dự án đổi màu LED RGB ESP32
Mình đã minh họa sẵn cách dự án hoạt động thông qua hình ảnh dưới:
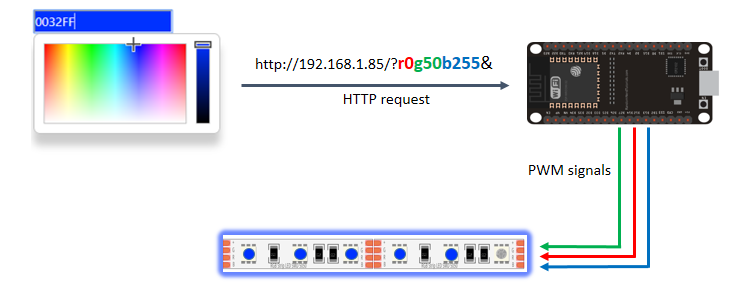
Cụ thể:
- Web Server có sẵn công cụ Picker Color cho chúng ta chọn màu
- Khi chọn màu xong, trình duyệt sẽ gửi một yêu cầu HTTP là địa chỉ URL có mã màu đã chọn (gồm sự pha trộn giữa màu red, green, blue – RGB)
- ESP32 nhận yêu cầu và xuất xung tín hiệu PWM tương ứng để điều khiển màu sắc của đèn LED
Chuẩn bị
- Mạch ESP32
- Dây đèn LED RGB
- Bóng bán dẫn NPN
- Điện trở
- Dây Jumper
- Bảng mạch Breadboard
Trong dự án này, mình sử dụng dây đèn LED có nguồn 5V và cấp nguồn thông qua cáp USB, ví dụ như hình:

Bạn cần lưu ý rằng có một số dây LED RGB cần nguồn 12V. Bạn có thể sử dụng bất kỳ loại nào mình thích, tuy nhiên cần phải cấp nguồn điện phù hợp nhé!
Kết nối
Bạn kết nối LED RGB với ESP32 theo sơ đồ bên dưới:

Nếu bạn sử dụng mạch EPS8266, bạn có thể tham khảo sơ đồ bên dưới:

Với bóng bán dẫn NPN (Transitor NPN), chúng ta có thể kết nối như bên dưới. Tùy thuộc vào số lượng đèn LED có trong chuỗi dây, bạn có thể sử dụng Transitor NPN để hỗ trợ cung cấp dòng điện liên tục:

Để xác định dây LED sử dụng lượng điện tối đa là bao nhiêu, bạn có thể đo tổng lượng điện tiêu thụ khi dây LED đang bật với độ sáng cao nhất (với màu trắng nhé).
Khi mình dùng 12 bóng LED, dòng điện tối đa sẽ ở mức khoảng 630mA khi bật độ sáng cao nhất ở mức độ ánh sáng trắng. Do đó, mình sẽ dùng bóng bán dẫn NPN S8050 để xử lý dòng điện ở mức 700mA.

Lưu ý quan trọng khi đo lượng điện này là bạn hãy bật chế độ màu trắng nhé, vì khi đó thì lượng điện tiêu thụ mới ở mức cao nhất được.
Chương trình điều khiển LED RGB ESP32
ESP32
Nếu bạn chưa cài tiện ích ESP32 trong Arduino IDE, bạn nhớ làm theo hướng dẫn sau để cài tiện ích này trước khi nạp chương trình nhé: Cách lập trình ESP32 bằng Arduino IDE (Windows, Linux, Mac OS X).
Dưới đây là chương trình đầy đủ, tuy nhiên bạn nhớ hãy đổi thông tin mạng WiFi thành của bạn rồi hãy nạp chương trình vào ESP32 nhé!
// Load Wi-Fi library
#include <WiFi.h>

// Replace with your network credentials
const char* ssid     = "REPLACE_WITH_YOUR_SSID";
const char* password = "REPLACE_WITH_YOUR_PASSWORD";

// Set web server port number to 80
WiFiServer server(80);

// Decode HTTP GET value
String redString = "0";
String greenString = "0";
String blueString = "0";
int pos1 = 0;
int pos2 = 0;
int pos3 = 0;
int pos4 = 0;

// Variable to store the HTTP req  uest
String header;

// Red, green, and blue pins for PWM control
const int redPin = 13;     // 13 corresponds to GPIO13
const int greenPin = 12;   // 12 corresponds to GPIO12
const int bluePin = 14;    // 14 corresponds to GPIO14

// Setting PWM frequency, channels and bit resolution
const int freq = 5000;
const int redChannel = 0;
const int greenChannel = 1;
const int blueChannel = 2;
// Bit resolution 2^8 = 256
const int resolution = 8;

// Current time
unsigned long currentTime = millis();
// Previous time
unsigned long previousTime = 0;
// Define timeout time in milliseconds (example: 2000ms = 2s)
const long timeoutTime = 2000;

void setup() {
  Serial.begin(115200);
  // configure LED PWM functionalitites
  ledcSetup(redChannel, freq, resolution);
  ledcSetup(greenChannel, freq, resolution);
  ledcSetup(blueChannel, freq, resolution);

  // attach the channel to the GPIO to be controlled
  ledcAttachPin(redPin, redChannel);
  ledcAttachPin(greenPin, greenChannel);
  ledcAttachPin(bluePin, blueChannel);

  // Connect to Wi-Fi network with SSID and password
  Serial.print("Connecting to ");
  Serial.println(ssid);
  WiFi.begin(ssid, password);
  while (WiFi.status() != WL_CONNECTED) {
    delay(500);
    Serial.print(".");
  }
  // Print local IP address and start web server
  Serial.println("");
  Serial.println("WiFi connected.");
  Serial.println("IP address: ");
  Serial.println(WiFi.localIP());
  server.begin();
}

void loop(){
  WiFiClient client = server.available();   // Listen for incoming clients

  if (client) {                             // If a new client connects,
    currentTime = millis();
    previousTime = currentTime;
    Serial.println("New Client.");          // print a message out in the serial port
    String currentLine = "";                // make a String to hold incoming data from the client
    while (client.connected() && currentTime - previousTime <= timeoutTime) {            // loop while the client's connected
      currentTime = millis();
      if (client.available()) {             // if there's bytes to read from the client,
        char c = client.read();             // read a byte, then
        Serial.write(c);                    // print it out the serial monitor
        header += c;
        if (c == '\n') {                    // if the byte is a newline character
          // if the current line is blank, you got two newline characters in a row.
          // that's the end of the client HTTP request, so send a response:
          if (currentLine.length() == 0) {
            // HTTP headers always start with a response code (e.g. HTTP/1.1 200 OK)
            // and a content-type so the client knows what's coming, then a blank line:
            client.println("HTTP/1.1 200 OK");
            client.println("Content-type:text/html");
            client.println("Connection: close");
            client.println();

            // Display the HTML web page
            client.println("<!DOCTYPE html><html>");
            client.println("<head><meta name=\"viewport\" content=\"width=device-width, initial-scale=1\">");
            client.println("<link rel=\"icon\" href=\"data:,\">");
            client.println("<link rel=\"stylesheet\" href=\"https://stackpath.bootstrapcdn.com/bootstrap/4.3.1/css/bootstrap.min.css\">");
            client.println("<script src=\"https://cdnjs.cloudflare.com/ajax/libs/jscolor/2.0.4/jscolor.min.js\"></script>");
            client.println("</head><body><div class=\"container\"><div class=\"row\"><h1>ESP Color Picker</h1></div>");
            client.println("<a class=\"btn btn-primary btn-lg\" href=\"#\" id=\"change_color\" role=\"button\">Change Color</a> ");
            client.println("<input class=\"jscolor {onFineChange:'update(this)'}\" id=\"rgb\"></div>");
            client.println("<script>function update(picker) {document.getElementById('rgb').innerHTML = Math.round(picker.rgb[0]) + ', ' +  Math.round(picker.rgb[1]) + ', ' + Math.round(picker.rgb[2]);");
            client.println("document.getElementById(\"change_color\").href=\"?r\" + Math.round(picker.rgb[0]) + \"g\" +  Math.round(picker.rgb[1]) + \"b\" + Math.round(picker.rgb[2]) + \"&\";}</script></body></html>");
            // The HTTP response ends with another blank line
            client.println();

            // Request sample: /?r201g32b255&
            // Red = 201 | Green = 32 | Blue = 255
            if(header.indexOf("GET /?r") >= 0) {
              pos1 = header.indexOf('r');
              pos2 = header.indexOf('g');
              pos3 = header.indexOf('b');
              pos4 = header.indexOf('&');
              redString = header.substring(pos1+1, pos2);
              greenString = header.substring(pos2+1, pos3);
              blueString = header.substring(pos3+1, pos4);
              /*Serial.println(redString.toInt());
              Serial.println(greenString.toInt());
              Serial.println(blueString.toInt());*/
              ledcWrite(redChannel, redString.toInt());
              ledcWrite(greenChannel, greenString.toInt());
              ledcWrite(blueChannel, blueString.toInt());
            }
            // Break out of the while loop
            break;
          } else { // if you got a newline, then clear currentLine
            currentLine = "";
          }
        } else if (c != '\r') {  // if you got anything else but a carriage return character,
          currentLine += c;      // add it to the end of the currentLine
        }
      }
    }
    // Clear the header variable
    header = "";
    // Close the connection
    client.stop();
    Serial.println("Client disconnected.");
    Serial.println("");
  }
}
1
Nếu bạn đã từng xây dựng một Web Server trên ESP32 thì bạn sẽ quá quen thuộc với chương trình này, chỉ khác một cái là chúng ta sử dụng công cụ Picker Color và gửi yêu cầu HTTP có chứa mã màu.
ESP8266
Nếu sử dụng ESP8266, bạn cũng nhớ cài tiện ích ESP8622 trong Arduino IDE nhé! Sau đó, bạn hãy thay đổi thông tin mạng WiFi của đoạn code sau và nạp vào mạch:
/*********
  Rui Santos
  Complete project details at http://randomnerdtutorials.com
*********/

// Load Wi-Fi library
#include <ESP8266WiFi.h>

// Replace with your network credentials
const char* ssid     = "REPLACE_WITH_YOUR_SSID";
const char* password = "REPLACE_WITH_YOUR_PASSWORD";

// Set web server port number to 80
WiFiServer server(80);

// Decode HTTP GET value
String redString = "0";
String greenString = "0";
String blueString = "0";
int pos1 = 0;
int pos2 = 0;
int pos3 = 0;
int pos4 = 0;

// Variable to store the HTTP req  uest
String header;

// Red, green, and blue pins for PWM control
const int redPin = 13;     // 13 corresponds to GPIO13
const int greenPin = 12;   // 12 corresponds to GPIO12
const int bluePin = 14;    // 14 corresponds to GPIO14

// Setting PWM bit resolution
const int resolution = 256;

// Current time
unsigned long currentTime = millis();
// Previous time
unsigned long previousTime = 0;
// Define timeout time in milliseconds (example: 2000ms = 2s)
const long timeoutTime = 2000;

void setup() {
  Serial.begin(115200);

  // configure LED PWM resolution/range and set pins to LOW
  analogWriteRange(resolution);
  analogWrite(redPin, 0);
  analogWrite(greenPin, 0);
  analogWrite(bluePin, 0);

  // Connect to Wi-Fi network with SSID and password
  Serial.print("Connecting to ");
  Serial.println(ssid);
  WiFi.begin(ssid, password);
  while (WiFi.status() != WL_CONNECTED) {
    delay(500);
    Serial.print(".");
  }
  // Print local IP address and start web server
  Serial.println("");
  Serial.println("WiFi connected.");
  Serial.println("IP address: ");
  Serial.println(WiFi.localIP());
  server.begin();
}

void loop(){
  WiFiClient client = server.available();   // Listen for incoming clients

  if (client) {                             // If a new client connects,
    currentTime = millis();
    previousTime = currentTime;
    Serial.println("New Client.");          // print a message out in the serial port
    String currentLine = "";                // make a String to hold incoming data from the client
    while (client.connected() && currentTime - previousTime <= timeoutTime) {            // loop while the client's connected
      currentTime = millis();
      if (client.available()) {             // if there's bytes to read from the client,
        char c = client.read();             // read a byte, then
        Serial.write(c);                    // print it out the serial monitor
        header += c;
        if (c == '\n') {                    // if the byte is a newline character
          // if the current line is blank, you got two newline characters in a row.
          // that's the end of the client HTTP request, so send a response:
          if (currentLine.length() == 0) {
            // HTTP headers always start with a response code (e.g. HTTP/1.1 200 OK)
            // and a content-type so the client knows what's coming, then a blank line:
            client.println("HTTP/1.1 200 OK");
            client.println("Content-type:text/html");
            client.println("Connection: close");
            client.println();

            // Display the HTML web page
            client.println("<!DOCTYPE html><html>");
            client.println("<head><meta name=\"viewport\" content=\"width=device-width, initial-scale=1\">");
            client.println("<link rel=\"icon\" href=\"data:,\">");
            client.println("<link rel=\"stylesheet\" href=\"https://stackpath.bootstrapcdn.com/bootstrap/4.3.1/css/bootstrap.min.css\">");
            client.println("<script src=\"https://cdnjs.cloudflare.com/ajax/libs/jscolor/2.0.4/jscolor.min.js\"></script>");
            client.println("</head><body><div class=\"container\"><div class=\"row\"><h1>ESP Color Picker</h1></div>");
            client.println("<a class=\"btn btn-primary btn-lg\" href=\"#\" id=\"change_color\" role=\"button\">Change Color</a> ");
            client.println("<input class=\"jscolor {onFineChange:'update(this)'}\" id=\"rgb\"></div>");
            client.println("<script>function update(picker) {document.getElementById('rgb').innerHTML = Math.round(picker.rgb[0]) + ', ' +  Math.round(picker.rgb[1]) + ', ' + Math.round(picker.rgb[2]);");
            client.println("document.getElementById(\"change_color\").href=\"?r\" + Math.round(picker.rgb[0]) + \"g\" +  Math.round(picker.rgb[1]) + \"b\" + Math.round(picker.rgb[2]) + \"&\";}</script></body></html>");
            // The HTTP response ends with another blank line
            client.println();

            // Request sample: /?r201g32b255&
            // Red = 201 | Green = 32 | Blue = 255
            if(header.indexOf("GET /?r") >= 0) {
              pos1 = header.indexOf('r');
              pos2 = header.indexOf('g');
              pos3 = header.indexOf('b');
              pos4 = header.indexOf('&');
              redString = header.substring(pos1+1, pos2);
              greenString = header.substring(pos2+1, pos3);
              blueString = header.substring(pos3+1, pos4);
              /*Serial.println(redString.toInt());
              Serial.println(greenString.toInt());
              Serial.println(blueString.toInt());*/
              analogWrite(redPin, redString.toInt());
              analogWrite(greenPin, greenString.toInt());
              analogWrite(bluePin, blueString.toInt());
            }
            // Break out of the while loop
            break;
          } else { // if you got a newline, then clear currentLine
            currentLine = "";
          }
        } else if (c != '\r') {  // if you got anything else but a carriage return character,
          currentLine += c;      // add it to the end of the currentLine
        }
      }
    }
    // Clear the header variable
    header = "";
    // Close the connection
    client.stop();
    Serial.println("Client disconnected.");
    Serial.println("");
  }
}
1
Giải thích chương trình
Vì chương trình điều khiển LED RGB trên ESP32 và ESP8266 đều khá giống nhau, nên dưới đây mình chỉ giải thích chung nhé! Có một số phần khác biệt như cách tạo tín hiệu xung PWM và thư viện WiFi thì mình cũng sẽ giải thích chi tiết kèm theo bên dưới.
Tạo thư viện WiFi trong ESP32:
#include <WiFi.h>
Với ESP8266, chúng ta sử dụng thư viện ESP8266WiFi:
#include <ESP8266WiFi.h>
Tạo các dòng lệnh để lưu giá trị của màu đỏ (R-red), xanh lá (G-green) và xanh dương (B-blue) theo yêu cầu:
String redString = "0";
String greenString = "0";
String blueString = "0";
Tạo 4 biến khác nhau để giải mã yêu cầu HTTP:
int pos1 = 0;
int pos2 = 0;
int pos3 = 0;
int pos4 = 0;
Tạo 3 biến cho các cổng GPIO để kiểm soát giá trị của giá trị R, G, B của đèn LED RGB ESP32. Mình đang dùng cổng GPIO 13 (red), 12 (green) và 14 (blue) nên chương trình như sau:
const int redPin = 13;
const int greenPin = 12;
const int bluePin = 14;
Xuất tín hiệu PWM với tần số 5000Hz, đồng thời liên kết các kênh PWM cho từng màu riêng biệt (lưu ý với mạch ESP8266 thì chúng ta không cần liên kết);
const int freq = 5000;
const int redChannel = 0;
const int greenChannel = 1;
const int blueChannel = 2;
Cấu hình độ phân giải của xung tín hiệu PWM thành 8 bit (điều này cũng không cần thiết trong ESP8266):
const int resolution = 8;
Trong setting(), gán thuộc tính PWM cho các kênh PWM (không cần thiết trong ESP8266)
ledcSetup(redChannel, freq, resolution);
ledcSetup(greenChannel, freq, resolution);
ledcSetup(blueChannel, freq, resolution);
Gắn PWM vào các chân GPIO tương ứng (không cần thiết trong ESP8266):
ledcAttachPin(redPin, redChannel);
ledcAttachPin(greenPin, greenChannel);
ledcAttachPin(bluePin, blueChannel);
Hiển thị bảng màu Color Picker để người dùng thay đổi màu sắc LED RGB ESP32 tùy thích theo nhu cầu, sau đó gửi yêu cầu HTTP:
client.println("<!DOCTYPE html><html>");
client.println("<head><meta name=\"viewport\" content=\"width=device-width, initial-scale=1\">");
client.println("<link rel=\"icon\" href=\"data:,\">");
client.println("<link rel=\"stylesheet\" href=\"https://stackpath.bootstrapcdn.com/bootstrap/4.3.1/css/bootstrap.min.css\">");
client.println("<script src=\"https://cdnjs.cloudflare.com/ajax/libs/jscolor/2.0.4/jscolor.min.js\"></script>");
client.println("</head><body><div class=\"container\"><div class=\"row\"><h1>ESP Color Picker</h1></div>");
client.println("<a class=\"btn btn-primary btn-lg\" href=\"#\" id=\"change_color\" role=\"button\">Change Color</a> ");
client.println("<input class=\"jscolor {onFineChange:'update(this)'}\" id=\"rgb\"></div>");
client.println("<script>function update(picker) {document.getElementById('rgb').innerHTML = Math.round(picker.rgb[0]) + ', ' +  Math.round(picker.rgb[1]) + ', ' + Math.round(picker.rgb[2]);");        client.println("document.getElementById(\"change_color\").href=\"?r\" + Math.round(picker.rgb[0]) + \"g\" +  Math.round(picker.rgb[1]) + \"b\" + Math.round(picker.rgb[2]) + \"&\";}</script></body></html>");
// The HTTP response ends with another blank line
client.println();
Sau khi LED RGB ESP32 được chọn một màu bất kỳ, mạch ESP32 sẽ nhận được một yêu cầu theo định dạng như bên dưới:
/?r201g32255&b
Khi đó, ESP32 cần phân tách yêu cầu để lấy mã màu R, G, B tương ứng nhằm điều khiển đèn LED RGB:
pos1 = header.indexOf('r');
pos2 = header.indexOf('g');
pos3 = header.indexOf('b');
pos4 = header.indexOf('&');
redString = header.substring(pos1+1, pos2);
greenString = header.substring(pos2+1, pos3);
blueString = header.substring(pos3+1, pos4);
Xuất xung tín hiệu PWM để điều khiển đèn LED RGB ESP32 đổi màu theo yêu cầu từ HTTP:
ledcWrite(redChannel, redString.toInt());
ledcWrite(greenChannel, greenString.toInt());
ledcWrite(blueChannel, blueString.toInt());
Còn riêng với ESP8266, để điều khiển đèn LED RGB qua Web Server, bạn chỉ cần sử dụng analogWrite() để tạo xung tín hiệu PWM và giải mã yêu cầu HTTP:
analogWrite(redPin, redString.toInt());
analogWrite(greenPin, greenString.toInt());
analogWrite(bluePin, blueString.toInt())
toInt giúp chúng ta đổi giá trị trong biến chuỗi (String) thành một số nguyên mà EPS32 có thể hiểu được.
Kết quả
Sau khi thay đổi mạng thông tin WiFi, bạn hãy nạp chương trình vào mạch ESP32 và mở Serial Monitor lên nhé (ở tốc độ 115200). Sau đó, bạn hãy reset lại mạch để lấy địa chỉ IP của mạch:

Sau đó, bạn hãy copy địa chỉ IP này và paste vào trình duyệt Google Chrome/ Cốc Cốc,… trên điện thoại hoặc máy tính. Một Web Server sẽ hiện ra như hình dưới, để bạn điều chỉnh màu đèn LED RGB ESP32:

Bạn có thể thay đổi màu sắc và nhấn nút Change Color để xem hiệu quả nhé:

Để tắt đèn LED, bạn chỉ cần bật màu đen. Khi bạn chọn cường độ màu mạnh nhất nằm ở trên cùng của Color Picker như hình dưới, đèn LED sẽ sáng hơn:

Bạn hãy thử trang trí dãy đèn này ở bất kỳ nơi nào trong nhà mà bạn thích, chẳng hạn như dưới gầm bàn gaming, dưới gầm giường, viền tivi,… tùy thích nhé!
Lời kết
Trong bài viết này, IoTZone đã hướng dẫn bạn cách điều khiển LED RGB ESP32 thông qua Web Server. Bạn có thể dùng điện thoại, máy tính,… hoặc thiết bị điện tử nào có thể truy cập Internet để điều khiển đổi màu đèn LED nhé! Chúc các bạn thành công.

