Trong dự án này, chúng ta sẽ cùng làm 1 ứng dụng về Web Server với ESP32, cụ thể sẽ hiển thị thông tin đọc được từ MPU 6050 (gia tốc kế và con quay hồi chuyển). Chúng ta cũng sẽ tạo ra 1 hình vẽ 3D minh họa trên Web.
Các kết quả đọc từ MPU6050 sẽ được cập nhật tự động bằng Server-Sent Events và hình vẽ 3D được xây dựng trên thư viện JavaScript có tên là three.js.
Để xây dựng ESP32 Web Server, chúng ta sẽ sử dụng thư viện ESPAsyncWebServer để tạo ra các máy chủ Web không đồng bộ, và xử lý các sự kiện do Server gửi.
Tổng quan dự án với MPU 6050
Đầu tiên, mình sẽ giải thích về cách dự án hoạt động của máy chủ web, để bạn dễ hiểu hơn:
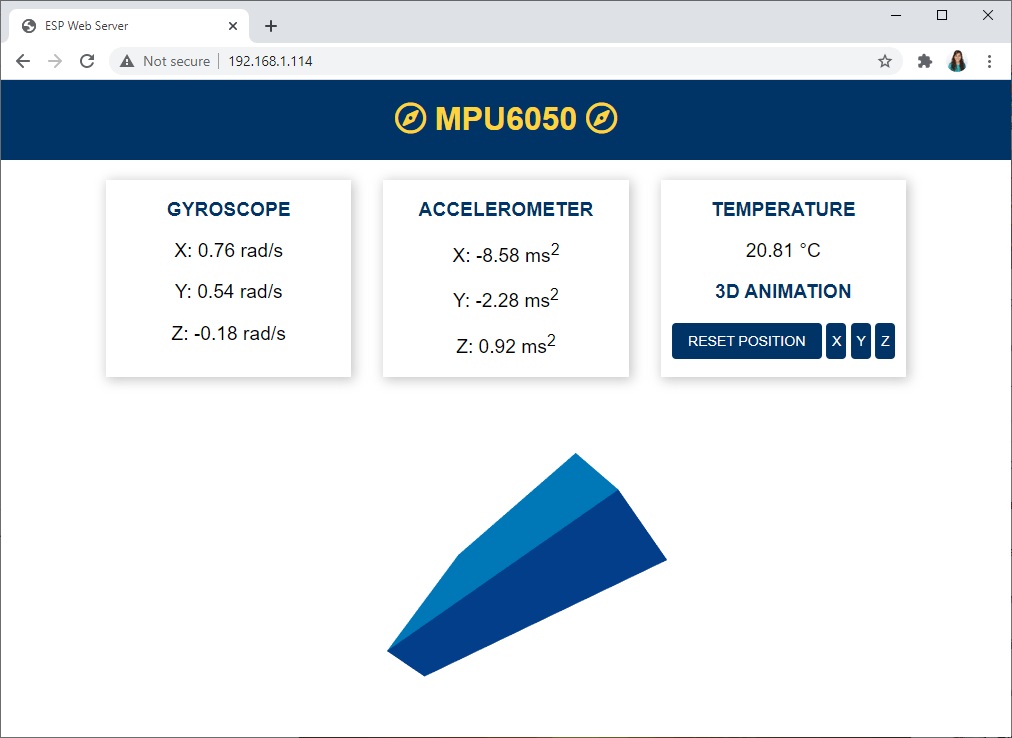
- Máy chủ web hiển thị các giá trị con quay hồi chuyển (theo 3 trục là trục X, Y và Z)
- Sau mỗi 10 mili giây thì các giá trị này được cập nhật 1 lần trên Web Server (1 giây = 1000 mili giây)
- Web Server cũng hiển thị các giá trị gia tốc kế (X, Y, Z). Các giá trị này được cập nhật liên tục sau mỗi 200 mili giây;
- MPU 6050 cũng hỗ trợ đo nhiệt độ, nên chúng ta cũng sẽ hiển thị giá trị nhiệt độ trên ESP32 Web Server. Nhiệt độ được cập nhật mỗi giây (1000 mili giây);
- Tất cả các giá trị đọc được này đều được cập nhật bằng Server-Sent Events;
- Chúng ta cũng sẽ vẽ một hình ảnh 3D của cảm biến. Hướng của vật thể 3D sẽ thay đổi theo hướng cảm biến. Vị trí hiện tại của cảm biến được tính toán dựa trên các giá trị của con quay hồi chuyển MPU 6050.
- Hình vẽ 3D trên được tạo bằng thư viện JavaScript có tên là three.js ;
- Trên Web Server sẽ có 4 nút để điều chỉnh vị trí của đối tượng 3D:
- ĐẶT LẠI VỊ TRÍ: đặt vị trí góc về 0 trên tất cả các trục;
- X: đặt vị trí góc X về 0;
- Y: đặt vị trí góc Y về 0;
- Z: đặt vị trí góc Z về 0;

Giới thiệu ESP32 Filesystem
Để giúp dự án được cấu trúc theo 1 cách dễ hiểu hơn, chúng ta sẽ tạo 4 file khác nhau để phục vụ máy chủ Web như hình:
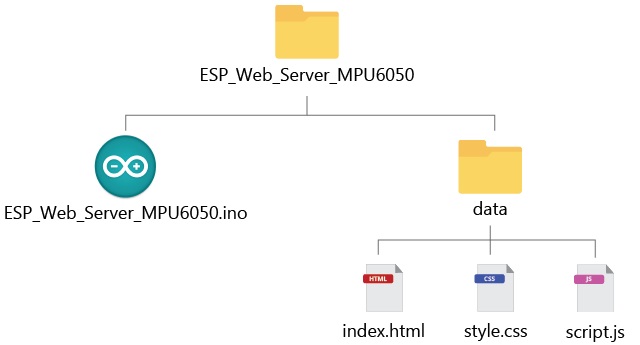
Các tệp html, css và js sẽ được tải lên ESP32 LittleFS filesystem. Để tải lên, chúng ta sẽ sử dụng plugin LittleFS Uploader. Bạn cần phải cài đặt plugin này trong Arduino IDE, trước khi thực hiện theo hướng dẫn này nhé!
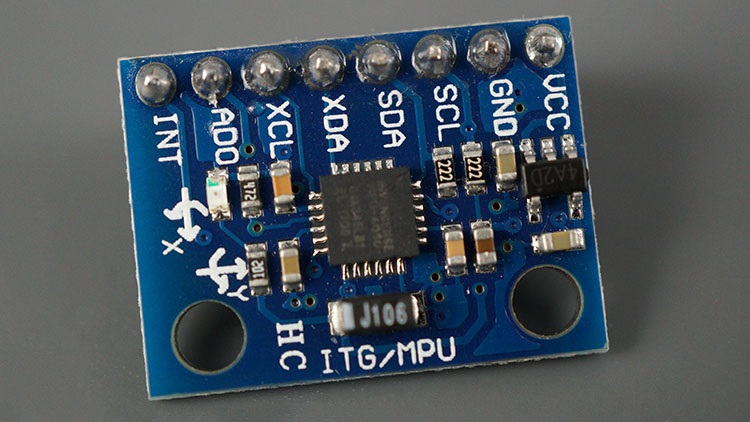
Giới thiệu gia tốc kế và con quay hồi chuyển MPU 6050
MPU 6050 là 1 module có gia tốc kế 3 trục và con quay hồi chuyển 3 trục.
>> Hướng dẫn liên quan: Ví dụ cách dùng ESP32 MPU6050 trên Arduino IDE
Bây giờ, chúng ta sẽ cùng tìm hiểu cách tạo từng file trên, và cuối cùng là xây dựng máy chủ ESP32 Web Server như mô tả nhé!
Xây dựng file HTML
Tạo 1 file có tên là index.html như sau:
<!DOCTYPE HTML><html>
<head>
<title>ESP Web Server</title>
<meta name="viewport" content="width=device-width, initial-scale=1">
<link rel="icon" href="data:,">
<link rel="stylesheet" type="text/css" href="style.css">
<link rel="stylesheet" href="https://use.fontawesome.com/releases/v5.7.2/css/all.css" integrity="sha384-fnmOCqbTlWIlj8LyTjo7mOUStjsKC4pOpQbqyi7RrhN7udi9RwhKkMHpvLbHG9Sr" crossorigin="anonymous">
<script src="https://cdnjs.cloudflare.com/ajax/libs/three.js/107/three.min.js"></script>
</head>
<body>
<div class="topnav">
<h1><i class="far fa-compass"></i> MPU6050 <i class="far fa-compass"></i></h1>
</div>
<div class="content">
<div class="cards">
<div class="card">
<p class="card-title">GYROSCOPE</p>
<p><span class="reading">X: <span id="gyroX"></span> rad</span></p>
<p><span class="reading">Y: <span id="gyroY"></span> rad</span></p>
<p><span class="reading">Z: <span id="gyroZ"></span> rad</span></p>
</div>
<div class="card">
<p class="card-title">ACCELEROMETER</p>
<p><span class="reading">X: <span id="accX"></span> ms<sup>2</sup></span></p>
<p><span class="reading">Y: <span id="accY"></span> ms<sup>2</sup></span></p>
<p><span class="reading">Z: <span id="accZ"></span> ms<sup>2</sup></span></p>
</div>
<div class="card">
<p class="card-title">TEMPERATURE</p>
<p><span class="reading"><span id="temp"></span> °C</span></p>
<p class="card-title">3D ANIMATION</p>
<button id="reset" onclick="resetPosition(this)">RESET POSITION</button>
<button id="resetX" onclick="resetPosition(this)">X</button>
<button id="resetY" onclick="resetPosition(this)">Y</button>
<button id="resetZ" onclick="resetPosition(this)">Z</button>
</div>
</div>
<div class="cube-content">
<div id="3Dcube"></div>
</div>
</div>
<script src="script.js"></script>
</body>
</html>
Tạo tệp CSS
Tạo 1 file có tên style.css như sau:
html {
  font-family: Arial;
  display: inline-block;
  text-align: center;
}
p {
  font-size: 1.2rem;
}
body {
  margin: 0;
}
.topnav {
  overflow: hidden;
  background-color: #003366;
  color: #FFD43B;
  font-size: 1rem;
}
.content {
  padding: 20px;
}
.card {
  background-color: white;
  box-shadow: 2px 2px 12px 1px rgba(140,140,140,.5);
}
.card-title {
  color:#003366;
  font-weight: bold;
}
.cards {
  max-width: 800px;
  margin: 0 auto;
  display: grid; grid-gap: 2rem;
  grid-template-columns: repeat(auto-fit, minmax(200px, 1fr));
}
.reading {
  font-size: 1.2rem;
}
.cube-content{
  width: 100%;
  background-color: white;
  height: 300px; margin: auto;
  padding-top:2%;
}
#reset{
  border: none;
  color: #FEFCFB;
  background-color: #003366;
  padding: 10px;
  text-align: center;
  display: inline-block;
  font-size: 14px; width: 150px;
  border-radius: 4px;
}
#resetX, #resetY, #resetZ{
  border: none;
  color: #FEFCFB;
  background-color: #003366;
  padding-top: 10px;
  padding-bottom: 10px;
  text-align: center;
  display: inline-block;
  font-size: 14px;
  width: 20px;
  border-radius: 4px;
}
Tạo file Javascript
Tạo 1 file đặt tên là script.js:
let scene, camera, rendered, cube;

function parentWidth(elem) {
  return elem.parentElement.clientWidth;
}

function parentHeight(elem) {
  return elem.parentElement.clientHeight;
}

function init3D(){
  scene = new THREE.Scene();
  scene.background = new THREE.Color(0xffffff);

  camera = new THREE.PerspectiveCamera(75, parentWidth(document.getElementById("3Dcube")) / parentHeight(document.getElementById("3Dcube")), 0.1, 1000);

  renderer = new THREE.WebGLRenderer({ antialias: true });
  renderer.setSize(parentWidth(document.getElementById("3Dcube")), parentHeight(document.getElementById("3Dcube")));

  document.getElementById('3Dcube').appendChild(renderer.domElement);

  // Create a geometry
  const geometry = new THREE.BoxGeometry(5, 1, 4);

  // Materials of each face
  var cubeMaterials = [
    new THREE.MeshBasicMaterial({color:0x03045e}),
    new THREE.MeshBasicMaterial({color:0x023e8a}),
    new THREE.MeshBasicMaterial({color:0x0077b6}),
    new THREE.MeshBasicMaterial({color:0x03045e}),
    new THREE.MeshBasicMaterial({color:0x023e8a}),
    new THREE.MeshBasicMaterial({color:0x0077b6}),
  ];

  const material = new THREE.MeshFaceMaterial(cubeMaterials);

  cube = new THREE.Mesh(geometry, material);
  scene.add(cube);
  camera.position.z = 5;
  renderer.render(scene, camera);
}

// Resize the 3D object when the browser window changes size
function onWindowResize(){
  camera.aspect = parentWidth(document.getElementById("3Dcube")) / parentHeight(document.getElementById("3Dcube"));
  //camera.aspect = window.innerWidth /  window.innerHeight;
  camera.updateProjectionMatrix();
  //renderer.setSize(window.innerWidth, window.innerHeight);
  renderer.setSize(parentWidth(document.getElementById("3Dcube")), parentHeight(document.getElementById("3Dcube")));

}

window.addEventListener('resize', onWindowResize, false);

// Create the 3D representation
init3D();

// Create events for the sensor readings
if (!!window.EventSource) {
  var source = new EventSource('/events');

  source.addEventListener('open', function(e) {
    console.log("Events Connected");
  }, false);

  source.addEventListener('error', function(e) {
    if (e.target.readyState != EventSource.OPEN) {
      console.log("Events Disconnected");
    }
  }, false);

  source.addEventListener('gyro_readings', function(e) {
    //console.log("gyro_readings", e.data);
    var obj = JSON.parse(e.data);
    document.getElementById("gyroX").innerHTML = obj.gyroX;
    document.getElementById("gyroY").innerHTML = obj.gyroY;
    document.getElementById("gyroZ").innerHTML = obj.gyroZ;

    // Change cube rotation after receiving the readinds
    cube.rotation.x = obj.gyroY;
    cube.rotation.z = obj.gyroX;
    cube.rotation.y = obj.gyroZ;
    renderer.render(scene, camera);
  }, false);

  source.addEventListener('temperature_reading', function(e) {
    console.log("temperature_reading", e.data);
    document.getElementById("temp").innerHTML = e.data;
  }, false);

  source.addEventListener('accelerometer_readings', function(e) {
    console.log("accelerometer_readings", e.data);
    var obj = JSON.parse(e.data);
    document.getElementById("accX").innerHTML = obj.accX;
    document.getElementById("accY").innerHTML = obj.accY;
    document.getElementById("accZ").innerHTML = obj.accZ;
  }, false);
}

function resetPosition(element){
  var xhr = new XMLHttpRequest();
  xhr.open("GET", "/"+element.id, true);
  console.log(element.id);
  xhr.send();
}
Code trên Arduino
Cuối cùng, bạn hãy lập trình trên Arduino IDE, để hoàn thiện dự án ESP32 Web Server với MPU6050 này nhé! Bạn có thể copy đoạn code sau (lưu ý bạn cần thay đổi thông tin wifi để code hoạt động):
#include <Arduino.h>
#include <WiFi.h>
#include <AsyncTCP.h>
#include <ESPAsyncWebServer.h>
#include <Adafruit_MPU6050.h>
#include <Adafruit_Sensor.h>
#include <Arduino_JSON.h>
#include "LittleFS.h"

// Replace with your network credentials
const char* ssid = "REPLACE_WITH_YOUR_SSID";
const char* password = "REPLACE_WITH_YOUR_PASSWORD";

// Create AsyncWebServer object on port 80
AsyncWebServer server(80);

// Create an Event Source on /events
AsyncEventSource events("/events");

// Json Variable to Hold Sensor Readings
JSONVar readings;

// Timer variables
unsigned long lastTime = 0;
unsigned long lastTimeTemperature = 0;
unsigned long lastTimeAcc = 0;
unsigned long gyroDelay = 10;
unsigned long temperatureDelay = 1000;
unsigned long accelerometerDelay = 200;

// Create a sensor object
Adafruit_MPU6050 mpu;

sensors_event_t a, g, temp;

float gyroX, gyroY, gyroZ;
float accX, accY, accZ;
float temperature;

//Gyroscope sensor deviation
float gyroXerror = 0.07;
float gyroYerror = 0.03;
float gyroZerror = 0.01;

// Init MPU6050
void initMPU(){
  if (!mpu.begin()) {
    Serial.println("Failed to find MPU6050 chip");
    while (1) {
      delay(10);
    }
  }
  Serial.println("MPU6050 Found!");
}

void initLittleFS() {
  if (!LittleFS.begin()) {
    Serial.println("An error has occurred while mounting LittleFS");
  }
  Serial.println("LittleFS mounted successfully");
}

// Initialize WiFi
void initWiFi() {
  WiFi.mode(WIFI_STA);
  WiFi.begin(ssid, password);
  Serial.println("");
  Serial.print("Connecting to WiFi...");
  while (WiFi.status() != WL_CONNECTED) {
    Serial.print(".");
    delay(1000);
  }
  Serial.println("");
  Serial.println(WiFi.localIP());
}

String getGyroReadings(){
  mpu.getEvent(&a, &g, &temp);

  float gyroX_temp = g.gyro.x;
  if(abs(gyroX_temp) > gyroXerror)  {
    gyroX += gyroX_temp/50.00;
  }

  float gyroY_temp = g.gyro.y;
  if(abs(gyroY_temp) > gyroYerror) {
    gyroY += gyroY_temp/70.00;
  }

  float gyroZ_temp = g.gyro.z;
  if(abs(gyroZ_temp) > gyroZerror) {
    gyroZ += gyroZ_temp/90.00;
  }

  readings["gyroX"] = String(gyroX);
  readings["gyroY"] = String(gyroY);
  readings["gyroZ"] = String(gyroZ);

  String jsonString = JSON.stringify(readings);
  return jsonString;
}

String getAccReadings() {
  mpu.getEvent(&a, &g, &temp);
  // Get current acceleration values
  accX = a.acceleration.x;
  accY = a.acceleration.y;
  accZ = a.acceleration.z;
  readings["accX"] = String(accX);
  readings["accY"] = String(accY);
  readings["accZ"] = String(accZ);
  String accString = JSON.stringify (readings);
  return accString;
}

String getTemperature(){
  mpu.getEvent(&a, &g, &temp);
  temperature = temp.temperature;
  return String(temperature);
}

void setup() {
  Serial.begin(115200);
  initWiFi();
  initLittleFS();
  initMPU();

  // Handle Web Server
  server.on("/", HTTP_GET, [](AsyncWebServerRequest *request){
    request->send(LittleFS, "/index.html", "text/html");
  });

  server.serveStatic("/", LittleFS, "/");

  server.on("/reset", HTTP_GET, [](AsyncWebServerRequest *request){
    gyroX=0;
    gyroY=0;
    gyroZ=0;
    request->send(200, "text/plain", "OK");
  });

  server.on("/resetX", HTTP_GET, [](AsyncWebServerRequest *request){
    gyroX=0;
    request->send(200, "text/plain", "OK");
  });

  server.on("/resetY", HTTP_GET, [](AsyncWebServerRequest *request){
    gyroY=0;
    request->send(200, "text/plain", "OK");
  });

  server.on("/resetZ", HTTP_GET, [](AsyncWebServerRequest *request){
    gyroZ=0;
    request->send(200, "text/plain", "OK");
  });

  // Handle Web Server Events
  events.onConnect([](AsyncEventSourceClient *client){
    if(client->lastId()){
      Serial.printf("Client reconnected! Last message ID that it got is: %u\n", client->lastId());
    }
    // send event with message "hello!", id current millis
    // and set reconnect delay to 1 second
    client->send("hello!", NULL, millis(), 10000);
  });
  server.addHandler(&events);

  server.begin();
}

void loop() {
  if ((millis() - lastTime) > gyroDelay) {
    // Send Events to the Web Server with the Sensor Readings
    events.send(getGyroReadings().c_str(),"gyro_readings",millis());
    lastTime = millis();
  }
  if ((millis() - lastTimeAcc) > accelerometerDelay) {
    // Send Events to the Web Server with the Sensor Readings
    events.send(getAccReadings().c_str(),"accelerometer_readings",millis());
    lastTimeAcc = millis();
  }
  if ((millis() - lastTimeTemperature) > temperatureDelay) {
    // Send Events to the Web Server with the Sensor Readings
    events.send(getTemperature().c_str(),"temperature_reading",millis());
    lastTimeTemperature = millis();
  }
}
Để ESP32 Web Server của bạn hoạt động với MPU 6050 của chính bạn, bạn cần thay đổi tên và mật khẩu wifi ở các biến sau:
const char* ssid = "REPLACE_WITH_YOUR_SSID";
const char* password = "REPLACE_WITH_YOUR_PASSWORD";
Bây giờ, bạn hãy upload code vào và kiểm tra dự án của mình nhé! Chúc bạn thành công!
IoTZone – Chuyên cung cấp thiết bị điện tử & tài liệu cho Makers
- Website: https://iotzone.vn/
- Fanpage: https://www.facebook.com/Iotzonemaker
- SDT: 0364174499
- Zalo: https://zalo.me/0364174499