Bài viết này sẽ hướng dẫn bạn một dự án khác về ESP32 Cam Server – Sử dụng yêu cầu HTTP POST cùng với Arduino IDE để gửi hình ảnh từ ESP32 lên Server. Cụ thể, chúng ta sẽ gửi hình ảnh JPG / JPEG lên máy chủ local (Raspberry Pi LAMP server) hoặc lên máy chủ đám mây (Cloud Server).
Để làm được điều đó, chúng ta sẽ sử dụng tập lệnh PHP.
Lưu trữ ứng dụng PHP của bạn
Điểm quan trọng trong dự án ESP32 Cam Server này là chúng ta phải có 1 máy chủ local hoặc máy chủ Cloud để lưu trữ hình ảnh từ EPS32 CAM, và chúng ta sẽ truy cập vào đây để xem lại hình ảnh.
Dưới đây là cách truy cập vào để xem hình ảnh với từng option:
1. Raspberry Pi local server:
Với Server LAMP, bạn có thể truy cập vào hình ảnh theo hướng dẫn như hình dưới:
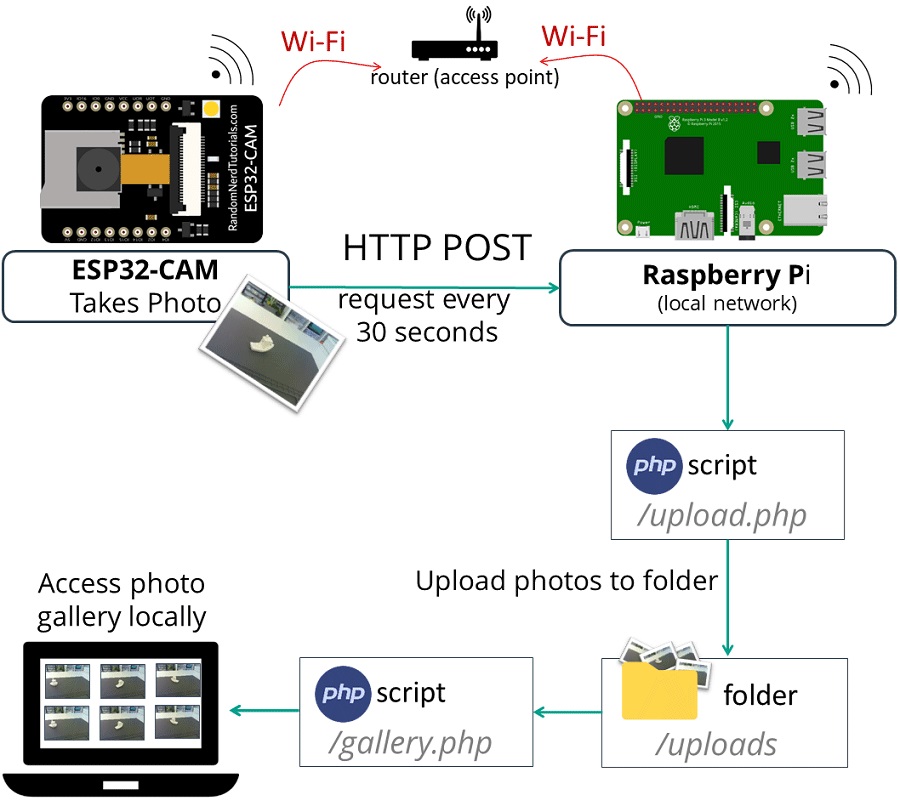
Bạn có thể khởi chạy LAMP Server trên Raspberry Pi để truy cập vào dữ liệu đã lưu trong local.
2. Cloud Server
Bạn cũng có thể sử dụng Cloud Server để lưu hình ảnh từ ESP32-CAM, và từ đó bạn có thể truy cập vào ảnh của mình từ mọi nơi trên thế giới thông qua tên miền và Server của riêng bạn.
Dưới đây là tổng quan về cách hoạt động của dự án ESP32 Cam Server khi lưu ảnh trên Cloud Server:
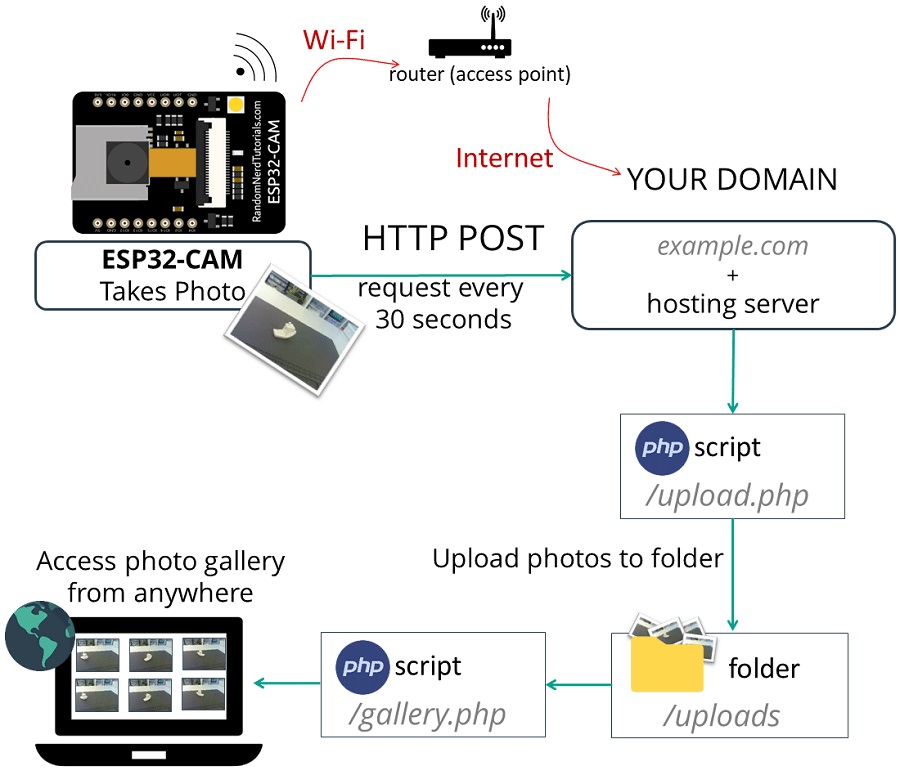
Khi mua tài khoản Hosting để lưu trữ ảnh, bạn cũng phải mua tên miền (domain). Đây là một trong những điểm thú vị của dự án ESP32 Cam Server này, so với các dự án bình thường khác. Bạn có thể truy cập vào tên miền của riêng bạn và xem ảnh đã lưu.
HTTP POST Request
The Hypertext Transfer Protocol (HTTP) là một giao thức hoạt động theo mô hình yêu cầu – phản hồi giữa Client và Server (máy khách và máy chủ). Ví dụ:
- ESP32 (máy khách – Client) gửi một yêu cầu HTTP tới Server (máy chủ)
- Server sẽ trả về kết quả cho ESP32
HTTP POST thường được dùng để gửi dữ liệu đến máy chủ và tạo mới / cập nhật một tài nguyên nào đó. Ví dụ như là xuất bản một hình ảnh lên Server.
POST /upload.php HTTP/1.1
Host: example.com
Content-Type: image/jpeg
Gửi hình ảnh qua local server – Chuẩn bị file PHP và upload folder
Trong mục này, bạn cần chuẩn bị file .PHP của mình và upload folder cho Raspberry Pi LAMP Server. Nếu bạn sử dụng máy chủ đám mây (cloud server) với tên miền và máy chủ riêng, bạn có thể xem phần tiếp theo và bỏ qua phần này.
Chạy câu lệnh sau:
pi@raspberrypi:~ $ cd /var/www/html/Tạo 1 thư mục có tên là uploads:
pi@raspberrypi:/var/www/html $ mkdir uploads
pi@raspberrypi:/var/www/html $ ls
uploads
Hiện tại, /var/www/html đang có quyền root. Hãy thay đổi quyền này và cấp tất cả quyền để sau này bạn có thể lưu ảnh bằng tập lệnh PHP trong dự án ESP32 Cam Server này:
sudo chown -R pi:pi /var/www/html
chmod -R 777 /var/www/html/
Tạo 1 file upload.php:
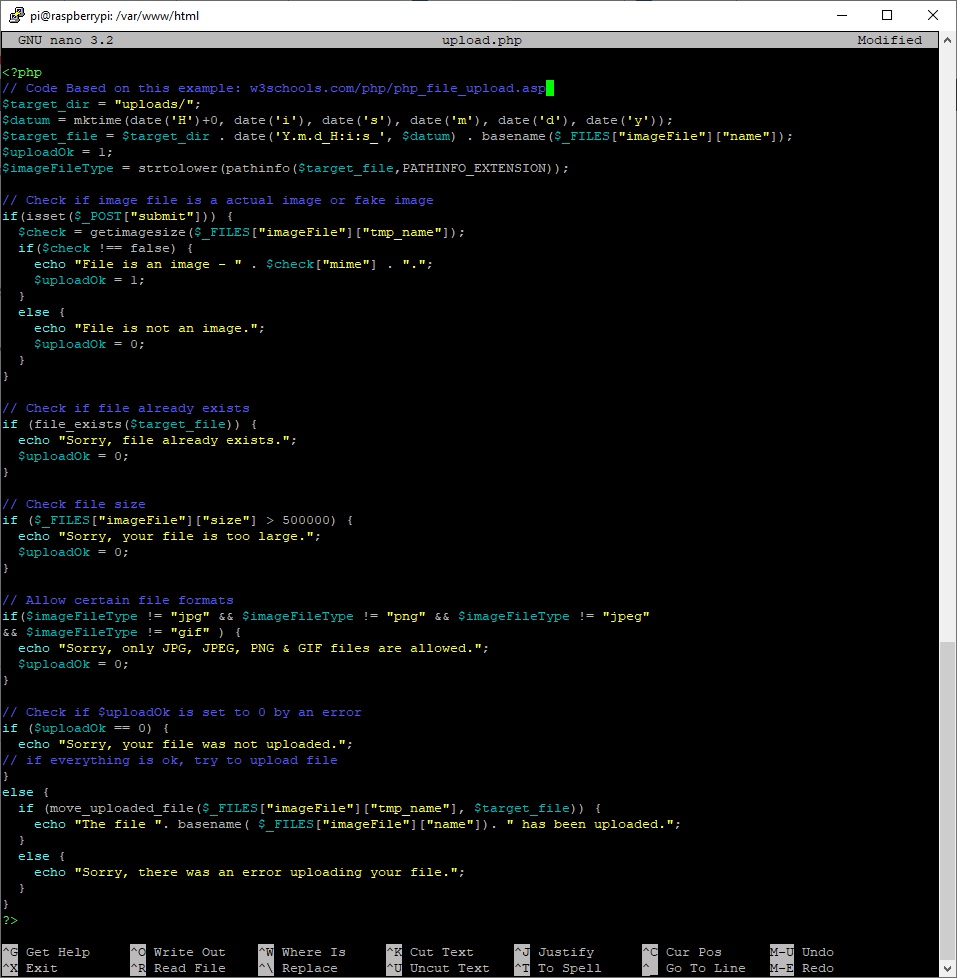
pi@raspberrypi:/var/www/html $ nano upload.phpĐoạn script PHP giúp nhận hình ảnh được gửi từ ESP32 Cam, đổi tên hình ảnh dựa trên mốc thời gian và lưu trữ chúng trong server:
<?php


$target_dir = "uploads/";
$datum = mktime(date('H')+0, date('i'), date('s'), date('m'), date('d'), date('y'));
$target_file = $target_dir . date('Y.m.d_H:i:s_', $datum) . basename($_FILES["imageFile"]["name"]);
$uploadOk = 1;
$imageFileType = strtolower(pathinfo($target_file,PATHINFO_EXTENSION));

// Kiem tra hinh anh
if(isset($_POST["submit"])) {
  $check = getimagesize($_FILES["imageFile"]["tmp_name"]);
  if($check !== false) {
    echo "File is an image - " . $check["mime"] . ".";
    $uploadOk = 1;
  }
  else {
    echo "File is not an image.";
    $uploadOk = 0;
  }
}

// Kiem tra file co ton tai hay khong
if (file_exists($target_file)) {
  echo "Sorry, file already exists.";
  $uploadOk = 0;
}

// Kiem tra kich co file
if ($_FILES["imageFile"]["size"] > 500000) {
  echo "Sorry, your file is too large.";
  $uploadOk = 0;
}

// Chap nhan format cua file
if($imageFileType != "jpg" && $imageFileType != "png" && $imageFileType != "jpeg"
&& $imageFileType != "gif" ) {
  echo "Sorry, only JPG, JPEG, PNG & GIF files are allowed.";
  $uploadOk = 0;
}

// kiem tra neu $uploadOk bang 0 va bao loi
if ($uploadOk == 0) {
  echo "Sorry, your file was not uploaded.";
// neu moi thu ok, hay upload file
}
else {
  if (move_uploaded_file($_FILES["imageFile"]["tmp_name"], $target_file)) {
    echo "The file ". basename( $_FILES["imageFile"]["name"]). " has been uploaded.";
  }
  else {
    echo "Sorry, there was an error uploading your file.";
  }
}
?>
File upload.php mà bạn tạo trong dự án ESP32 Cam Server nãy sẽ như hình dưới. Bạn hãy lưu file lại và nhấn exit:
Tạo file gallery.php:
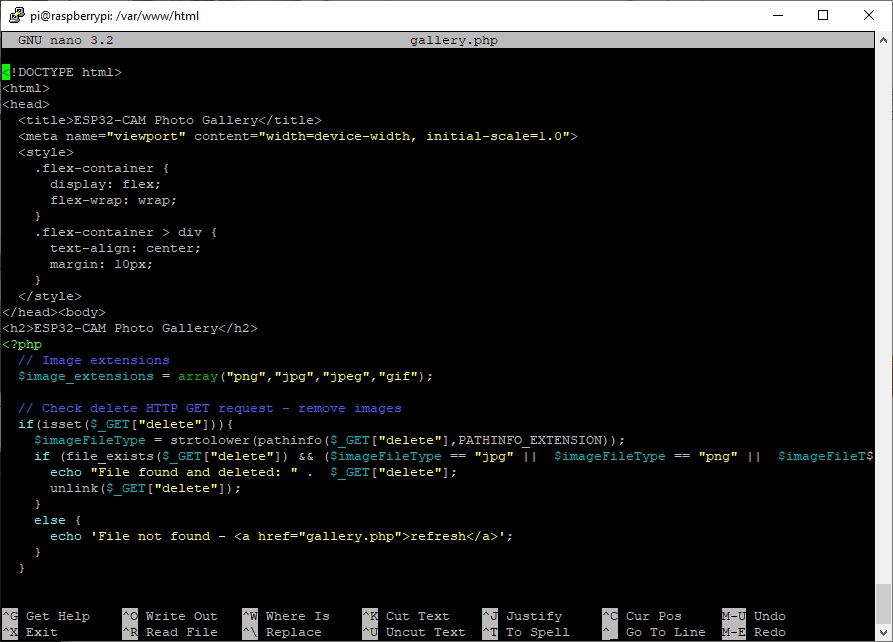
pi@raspberrypi:/var/www/html $ nano gallery.phpChỉnh sửa file vừa tạo và copy:
<!DOCTYPE html>
<html>
<head>
  <title>ESP32-CAM Photo Gallery</title>
  <meta name="viewport" content="width=device-width, initial-scale=1.0">
  <style>
    .flex-container {
      display: flex;
      flex-wrap: wrap;
    }
    .flex-container > div {
      text-align: center;
      margin: 10px;
    }
  </style>
</head><body>
<h2>ESP32-CAM Photo Gallery</h2>
<?php
  // Image extensions
  $image_extensions = array("png","jpg","jpeg","gif");

  // Check delete HTTP GET request - remove images
  if(isset($_GET["delete"])){
    $imageFileType = strtolower(pathinfo($_GET["delete"],PATHINFO_EXTENSION));
    if (file_exists($_GET["delete"]) && ($imageFileType == "jpg" ||  $imageFileType == "png" ||  $imageFileType == "jpeg") ) {
      echo "File found and deleted: " .  $_GET["delete"];
      unlink($_GET["delete"]);
    }
    else {
      echo 'File not found - <a href="gallery.php">refresh</a>';
    }
  }
  // Target directory
  $dir = 'uploads/';
  if (is_dir($dir)){
    echo '<div class="flex-container">';
    $count = 1;
    $files = scandir($dir);
    rsort($files);
    foreach ($files as $file) {
      if ($file != '.' && $file != '..') {?>
        <div>
          <p><a href="gallery.php?delete=<?php echo $dir . $file; ?>">Delete file</a> - <?php echo $file; ?></p>
          <a href="<?php echo $dir . $file; ?>">
            <img src="<?php echo $dir . $file; ?>" style="width: 350px;" alt="" title=""/>
          </a>
       </div>
<?php
       $count++;
      }
    }
  }
  if($count==1) { echo "<p>No images found</p>"; }
?>
  </div>
</body>
</html>
Đoạn script PHP sẽ giúp hiển thị hình ảnh trong thư viện. File gallery.php của bạn sẽ như hình dưới, bạn hãy lưu lại và thoát ra ngoài nhé:
Gửi hình ảnh lên Cloud Server – Chuẩn bị file .PHP và thư mục uploads
Nếu bạn muốn dùng Cloud Server trong dự án ESP32 Cam Server này, trước hết bạn cần 1 tài khoản hosting. Sau khi đăng nhập vào tài khoản hosting và cấu hình tên miền, bạn có thể đăng nhập vào màn hình điều khiển cPanel của bạn. Tại đó, bạn hãy mở File Manager.
Mở mục Advanced và chọn File Manager như hình:

Chọn vào mục public_html, nhấn vào nút + File để tạo 2 file mới, lần lượt có tên là upload.php và new gallery.php. Sau đó, click vào + Folder để tạo thư mục Uploads:

Với 3 file vừa tạo, đầu tiên, bạn chỉnh sửa file upload.php. Đoạn script PHP bên dưới sẽ giúp nhận hình ảnh được gửi từ ESP32 Cam, đổi tên dựa theo mốc thời gian nhận được và lưu trữ chúng:
$target_dir = "uploads/";
$datum = mktime(date('H')+0, date('i'), date('s'), date('m'), date('d'), date('y'));
$target_file = $target_dir . date('Y.m.d_H:i:s_', $datum) . basename($_FILES["imageFile"]["name"]);
$uploadOk = 1;
$imageFileType = strtolower(pathinfo($target_file,PATHINFO_EXTENSION));

// Kiem tra hinh anh
if(isset($_POST["submit"])) {
  $check = getimagesize($_FILES["imageFile"]["tmp_name"]);
  if($check !== false) {
    echo "File is an image - " . $check["mime"] . ".";
    $uploadOk = 1;
  }
  else {
    echo "File is not an image.";
    $uploadOk = 0;
  }
}

// Kiem tra hinh anh da ton tai chua
if (file_exists($target_file)) {
  echo "Sorry, file already exists.";
  $uploadOk = 0;
}

// Kiem tra kich co file
if ($_FILES["imageFile"]["size"] > 500000) {
  echo "Sorry, your file is too large.";
  $uploadOk = 0;
}

// Chap dan dinh dang file
if($imageFileType != "jpg" && $imageFileType != "png" && $imageFileType != "jpeg"
&& $imageFileType != "gif" ) {
  echo "Sorry, only JPG, JPEG, PNG & GIF files are allowed.";
  $uploadOk = 0;
}

// Check if $uploadOk is set to 0 by an error
if ($uploadOk == 0) {
  echo "Sorry, your file was not uploaded.";
// if everything is ok, try to upload file
}
else {
  if (move_uploaded_file($_FILES["imageFile"]["tmp_name"], $target_file)) {
    echo "The file ". basename( $_FILES["imageFile"]["name"]). " has been uploaded.";
  }
  else {
    echo "Sorry, there was an error uploading your file.";
  }
}
?>
Lưu file của bạn và thoát ra ngoài.
Tiếp theo, với file gallery.php, bạn copy đoạn script sau:
<!DOCTYPE html>
<html>
<head>
  <title>ESP32-CAM Photo Gallery</title>
  <meta name="viewport" content="width=device-width, initial-scale=1.0">
  <style>
    .flex-container {
      display: flex;
      flex-wrap: wrap;
    }
    .flex-container > div {
      text-align: center;
      margin: 10px;
    }
  </style>
</head><body>
<h2>ESP32-CAM Photo Gallery</h2>
<?php
  // Image extensions
  $image_extensions = array("png","jpg","jpeg","gif");

  // Check delete HTTP GET request - remove images
  if(isset($_GET["delete"])){
    $imageFileType = strtolower(pathinfo($_GET["delete"],PATHINFO_EXTENSION));
    if (file_exists($_GET["delete"]) && ($imageFileType == "jpg" ||  $imageFileType == "png" ||  $imageFileType == "jpeg") ) {
      echo "File found and deleted: " .  $_GET["delete"];
      unlink($_GET["delete"]);
    }
    else {
      echo 'File not found - <a href="gallery.php">refresh</a>';
    }
  }
  // Target directory
  $dir = 'uploads/';
  if (is_dir($dir)){
    echo '<div class="flex-container">';
    $count = 1;
    $files = scandir($dir);
    rsort($files);
    foreach ($files as $file) {
      if ($file != '.' && $file != '..') {?>
        <div>
          <p><a href="gallery.php?delete=<?php echo $dir . $file; ?>">Delete file</a> - <?php echo $file; ?></p>
          <a href="<?php echo $dir . $file; ?>">
            <img src="<?php echo $dir . $file; ?>" style="width: 350px;" alt="" title=""/>
          </a>
       </div>
<?php
       $count++;
      }
    }
  }
  if($count==1) { echo "<p>No images found</p>"; }
?>
  </div>
</body>
</html>
Đăng hình ảnh lên Server – Hoàn tất dự án ESP32 CAM Server
Bây giờ, bạn đã có server hoàn thiện để phục vụ cho dự án ESP32 CAM Server. Bây giờ, hãy setup mạch ESP32 – CAM để chúng gửi hình ảnh mới lên server của bạn sau mỗi 30 giây.
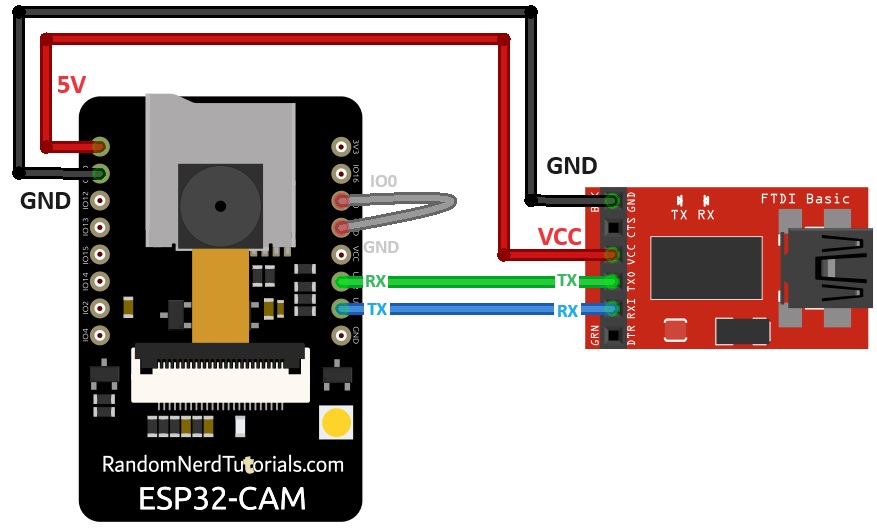
Chuẩn bị
- ESP32-CAM
- Dây jumper female to female
- FTDI programmer
- Nguồn điện 5V cho ESP32-CAM
- Local Server (như Raspberry Pi, thẻ nhớ microSD, nguồn cấp 5V 2.5A cho Raspberry)
- Cloud Server (như Bluehost)
Arduino IDE
Trước hết, bạn cần cài tiện ích ESP32 trong Arduino IDE của mình:
Cách lập trình ESP32 bằng Arduino IDE (Windows, Linux, Mac OS X)
Kiểm tra địa chỉ URL PHP
Bạn hãy thử mở địa chỉ IP cục bộ trên Raspberry Pi hoặc mở tên miền của mình, thêm phần đuôi là /upload.php và hệ thống sẽ trả về như sau:
Sorry, only JPG, JPEG, PNG & GIF files are allowed.Sorry, your file was not uploaded.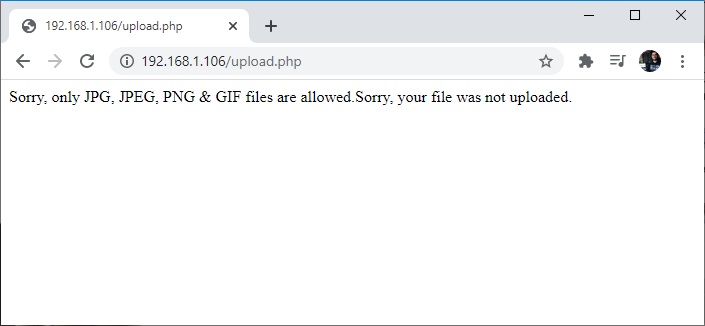
Nếu bạn nhận được các dòng thông báo trên, nghĩa là server của bạn đã sẵn sàng. Bạn có thể tiếp tục làm theo các hướng dẫn bên dưới.
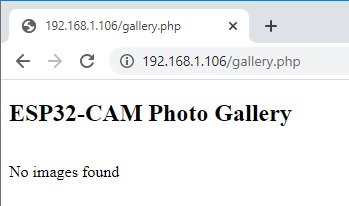
Ngoài ra, hãy thử truy cập vào /gallery.php, bạn sẽ thấy thông báo như hình dưới là ok:
Code cho ESP32
Nếu bạn sử dụng local server (không có TLS/SSL) hoặc Cloud Server không hỗ trợ HTTPS, bạn có thể làm theo lựa chọn 1.
Ngược lại, nếu Cloud Server có hỗ trợ HTTPS, bạn có thể làm theo lựa chọn 2.
Lựa chọn 1: HTTP POST Request
#include <Arduino.h>
#include <WiFi.h>
#include "soc/soc.h"
#include "soc/rtc_cntl_reg.h"
#include "esp_camera.h"

const char* ssid = "REPLACE_WITH_YOUR_SSID";
const char* password = "REPLACE_WITH_YOUR_PASSWORD";

String serverName = "192.168.1.XXX";   // REPLACE WITH YOUR Raspberry Pi IP ADDRESS
//String serverName = "example.com";   // OR REPLACE WITH YOUR DOMAIN NAME

String serverPath = "/upload.php";     // The default serverPath should be upload.php

const int serverPort = 80;

WiFiClient client;

// CAMERA_MODEL_AI_THINKER
#define PWDN_GPIO_NUM     32
#define RESET_GPIO_NUM    -1
#define XCLK_GPIO_NUM      0
#define SIOD_GPIO_NUM     26
#define SIOC_GPIO_NUM     27

#define Y9_GPIO_NUM       35
#define Y8_GPIO_NUM       34
#define Y7_GPIO_NUM       39
#define Y6_GPIO_NUM       36
#define Y5_GPIO_NUM       21
#define Y4_GPIO_NUM       19
#define Y3_GPIO_NUM       18
#define Y2_GPIO_NUM        5
#define VSYNC_GPIO_NUM    25
#define HREF_GPIO_NUM     23
#define PCLK_GPIO_NUM     22

const int timerInterval = 30000;    // time between each HTTP POST image
unsigned long previousMillis = 0;   // last time image was sent

void setup() {
  WRITE_PERI_REG(RTC_CNTL_BROWN_OUT_REG, 0);
  Serial.begin(115200);

  WiFi.mode(WIFI_STA);
  Serial.println();
  Serial.print("Connecting to ");
  Serial.println(ssid);
  WiFi.begin(ssid, password);
  while (WiFi.status() != WL_CONNECTED) {
    Serial.print(".");
    delay(500);
  }
  Serial.println();
  Serial.print("ESP32-CAM IP Address: ");
  Serial.println(WiFi.localIP());

  camera_config_t config;
  config.ledc_channel = LEDC_CHANNEL_0;
  config.ledc_timer = LEDC_TIMER_0;
  config.pin_d0 = Y2_GPIO_NUM;
  config.pin_d1 = Y3_GPIO_NUM;
  config.pin_d2 = Y4_GPIO_NUM;
  config.pin_d3 = Y5_GPIO_NUM;
  config.pin_d4 = Y6_GPIO_NUM;
  config.pin_d5 = Y7_GPIO_NUM;
  config.pin_d6 = Y8_GPIO_NUM;
  config.pin_d7 = Y9_GPIO_NUM;
  config.pin_xclk = XCLK_GPIO_NUM;
  config.pin_pclk = PCLK_GPIO_NUM;
  config.pin_vsync = VSYNC_GPIO_NUM;
  config.pin_href = HREF_GPIO_NUM;
  config.pin_sscb_sda = SIOD_GPIO_NUM;
  config.pin_sscb_scl = SIOC_GPIO_NUM;
  config.pin_pwdn = PWDN_GPIO_NUM;
  config.pin_reset = RESET_GPIO_NUM;
  config.xclk_freq_hz = 20000000;
  config.pixel_format = PIXFORMAT_JPEG;

  // init with high specs to pre-allocate larger buffers
  if(psramFound()){
    config.frame_size = FRAMESIZE_SVGA;
    config.jpeg_quality = 10;  //0-63 lower number means higher quality
    config.fb_count = 2;
  } else {
    config.frame_size = FRAMESIZE_CIF;
    config.jpeg_quality = 12;  //0-63 lower number means higher quality
    config.fb_count = 1;
  }

  // camera init
  esp_err_t err = esp_camera_init(&config);
  if (err != ESP_OK) {
    Serial.printf("Camera init failed with error 0x%x", err);
    delay(1000);
    ESP.restart();
  }

  sendPhoto();
}

void loop() {
  unsigned long currentMillis = millis();
  if (currentMillis - previousMillis >= timerInterval) {
    sendPhoto();
    previousMillis = currentMillis;
  }
}

String sendPhoto() {
  String getAll;
  String getBody;

  camera_fb_t * fb = NULL;
  fb = esp_camera_fb_get();
  if(!fb) {
    Serial.println("Camera capture failed");
    delay(1000);
    ESP.restart();
  }

  Serial.println("Connecting to server: " + serverName);

  if (client.connect(serverName.c_str(), serverPort)) {
    Serial.println("Connection successful!");
    String head = "--RandomNerdTutorials\r\nContent-Disposition: form-data; name=\"imageFile\"; filename=\"esp32-cam.jpg\"\r\nContent-Type: image/jpeg\r\n\r\n";
    String tail = "\r\n--RandomNerdTutorials--\r\n";

    uint32_t imageLen = fb->len;
    uint32_t extraLen = head.length() + tail.length();
    uint32_t totalLen = imageLen + extraLen;

    client.println("POST " + serverPath + " HTTP/1.1");
    client.println("Host: " + serverName);
    client.println("Content-Length: " + String(totalLen));
    client.println("Content-Type: multipart/form-data; boundary=RandomNerdTutorials");
    client.println();
    client.print(head);

    uint8_t *fbBuf = fb->buf;
    size_t fbLen = fb->len;
    for (size_t n=0; n<fbLen; n=n+1024) {
      if (n+1024 < fbLen) {
        client.write(fbBuf, 1024);
        fbBuf += 1024;
      }
      else if (fbLen%1024>0) {
        size_t remainder = fbLen%1024;
        client.write(fbBuf, remainder);
      }
    }
    client.print(tail);

    esp_camera_fb_return(fb);

    int timoutTimer = 10000;
    long startTimer = millis();
    boolean state = false;

    while ((startTimer + timoutTimer) > millis()) {
      Serial.print(".");
      delay(100);
      while (client.available()) {
        char c = client.read();
        if (c == '\n') {
          if (getAll.length()==0) { state=true; }
          getAll = "";
        }
        else if (c != '\r') { getAll += String(c); }
        if (state==true) { getBody += String(c); }
        startTimer = millis();
      }
      if (getBody.length()>0) { break; }
    }
    Serial.println();
    client.stop();
    Serial.println(getBody);
  }
  else {
    getBody = "Connection to " + serverName +  " failed.";
    Serial.println(getBody);
  }
  return getBody;
}
Lựa chọn 2: HTTPS POST Request
#include <Arduino.h>
#include <WiFi.h>
#include <WiFiClientSecure.h>
#include "soc/soc.h"
#include "soc/rtc_cntl_reg.h"
#include "esp_camera.h"

const char* ssid = "REPLACE_WITH_YOUR_SSID";
const char* password = "REPLACE_WITH_YOUR_PASSWORD";

String serverName = "example.com";   //REPLACE WITH YOUR DOMAIN NAME

String serverPath = "/upload.php";     // The default serverPath should be upload.php

const int serverPort = 443; //server port for HTTPS

WiFiClientSecure client;

// CAMERA_MODEL_AI_THINKER
#define PWDN_GPIO_NUM     32
#define RESET_GPIO_NUM    -1
#define XCLK_GPIO_NUM      0
#define SIOD_GPIO_NUM     26
#define SIOC_GPIO_NUM     27

#define Y9_GPIO_NUM       35
#define Y8_GPIO_NUM       34
#define Y7_GPIO_NUM       39
#define Y6_GPIO_NUM       36
#define Y5_GPIO_NUM       21
#define Y4_GPIO_NUM       19
#define Y3_GPIO_NUM       18
#define Y2_GPIO_NUM        5
#define VSYNC_GPIO_NUM    25
#define HREF_GPIO_NUM     23
#define PCLK_GPIO_NUM     22

const int timerInterval = 30000;    // time between each HTTP POST image
unsigned long previousMillis = 0;   // last time image was sent

void setup() {
  WRITE_PERI_REG(RTC_CNTL_BROWN_OUT_REG, 0);
  Serial.begin(115200);

  WiFi.mode(WIFI_STA);
  Serial.println();
  Serial.print("Connecting to ");
  Serial.println(ssid);
  WiFi.begin(ssid, password);
  while (WiFi.status() != WL_CONNECTED) {
    Serial.print(".");
    delay(500);
  }
  Serial.println();
  Serial.print("ESP32-CAM IP Address: ");
  Serial.println(WiFi.localIP());

  camera_config_t config;
  config.ledc_channel = LEDC_CHANNEL_0;
  config.ledc_timer = LEDC_TIMER_0;
  config.pin_d0 = Y2_GPIO_NUM;
  config.pin_d1 = Y3_GPIO_NUM;
  config.pin_d2 = Y4_GPIO_NUM;
  config.pin_d3 = Y5_GPIO_NUM;
  config.pin_d4 = Y6_GPIO_NUM;
  config.pin_d5 = Y7_GPIO_NUM;
  config.pin_d6 = Y8_GPIO_NUM;
  config.pin_d7 = Y9_GPIO_NUM;
  config.pin_xclk = XCLK_GPIO_NUM;
  config.pin_pclk = PCLK_GPIO_NUM;
  config.pin_vsync = VSYNC_GPIO_NUM;
  config.pin_href = HREF_GPIO_NUM;
  config.pin_sscb_sda = SIOD_GPIO_NUM;
  config.pin_sscb_scl = SIOC_GPIO_NUM;
  config.pin_pwdn = PWDN_GPIO_NUM;
  config.pin_reset = RESET_GPIO_NUM;
  config.xclk_freq_hz = 20000000;
  config.pixel_format = PIXFORMAT_JPEG;

  // init with high specs to pre-allocate larger buffers
  if(psramFound()){
    config.frame_size = FRAMESIZE_SVGA;
    config.jpeg_quality = 10;  //0-63 lower number means higher quality
    config.fb_count = 2;
  } else {
    config.frame_size = FRAMESIZE_CIF;
    config.jpeg_quality = 12;  //0-63 lower number means higher quality
    config.fb_count = 1;
  }

  // camera init
  esp_err_t err = esp_camera_init(&config);
  if (err != ESP_OK) {
    Serial.printf("Camera init failed with error 0x%x", err);
    delay(1000);
    ESP.restart();
  }

  sendPhoto();
}

void loop() {
  unsigned long currentMillis = millis();
  if (currentMillis - previousMillis >= timerInterval) {
    sendPhoto();
    previousMillis = currentMillis;
  }
}

String sendPhoto() {
  String getAll;
  String getBody;

  camera_fb_t * fb = NULL;
  fb = esp_camera_fb_get();
  if(!fb) {
    Serial.println("Camera capture failed");
    delay(1000);
    ESP.restart();
  }

  Serial.println("Connecting to server: " + serverName);

  client.setInsecure(); //skip certificate validation
  if (client.connect(serverName.c_str(), serverPort)) {
    Serial.println("Connection successful!");
    String head = "--RandomNerdTutorials\r\nContent-Disposition: form-data; name=\"imageFile\"; filename=\"esp32-cam.jpg\"\r\nContent-Type: image/jpeg\r\n\r\n";
    String tail = "\r\n--RandomNerdTutorials--\r\n";

    uint32_t imageLen = fb->len;
    uint32_t extraLen = head.length() + tail.length();
    uint32_t totalLen = imageLen + extraLen;

    client.println("POST " + serverPath + " HTTP/1.1");
    client.println("Host: " + serverName);
    client.println("Content-Length: " + String(totalLen));
    client.println("Content-Type: multipart/form-data; boundary=RandomNerdTutorials");
    client.println();
    client.print(head);

    uint8_t *fbBuf = fb->buf;
    size_t fbLen = fb->len;
    for (size_t n=0; n<fbLen; n=n+1024) {
      if (n+1024 < fbLen) {
        client.write(fbBuf, 1024);
        fbBuf += 1024;
      }
      else if (fbLen%1024>0) {
        size_t remainder = fbLen%1024;
        client.write(fbBuf, remainder);
      }
    }
    client.print(tail);

    esp_camera_fb_return(fb);

    int timoutTimer = 10000;
    long startTimer = millis();
    boolean state = false;

    while ((startTimer + timoutTimer) > millis()) {
      Serial.print(".");
      delay(100);
      while (client.available()) {
        char c = client.read();
        if (c == '\n') {
          if (getAll.length()==0) { state=true; }
          getAll = "";
        }
        else if (c != '\r') { getAll += String(c); }
        if (state==true) { getBody += String(c); }
        startTimer = millis();
      }
      if (getBody.length()>0) { break; }
    }
    Serial.println();
    client.stop();
    Serial.println(getBody);
  }
  else {
    getBody = "Connection to " + serverName +  " failed.";
    Serial.println(getBody);
  }
  return getBody;
}
Chèn thông tin Server, Camera và mạng WiFi
Trước khi upload code vào mạch ESP32 của mình, bạn cần thay đổi các thông tin như mạng WiFi:
const char* ssid = "REPLACE_WITH_YOUR_SSID";
const char* password = "REPLACE_WITH_YOUR_PASSWORD";
Để dự án ESP32 Cam Server hoạt động, bạn cần đảm bảo rằng đã chọn đúng module camera. Trong đoạn code trên, mình đang dùng AI-THINKER Model. Nếu bạn dùng model khác thì nhớ chỉnh sửa lại nhé!
Ngoài ra, bạn cần thêm địa chỉ IP của Raspberry Pi và tên domain:
String serverName = "192.168.1.XXX";   // REPLACE WITH YOUR Raspberry Pi IP ADDRESS
//String serverName = "example.com";   // OR REPLACE WITH YOUR DOMAIN NAME
String serverPath = "/upload.php";     // The default serverPath should be upload.php
Nạp code và kết nối, hoàn thiện dự án ESP32 Cam Server
Bây giờ, bạn có thể upload code vào ESP32 của mình. Sau đó, hãy kết nối mạch ESP32 CAM tới máy tính thông qua FTDI programmer:
Chúc bạn thực hiện dự án ESP32 CAM Server trên thành công!
IoTZone – Chuyên cung cấp thiết bị điện tử & tài liệu cho Makers
- Website: https://iotzone.vn/
- Fanpage: https://www.facebook.com/Iotzonemaker
- SDT: 0364174499
- Zalo: https://zalo.me/0364174499