Trong bài hướng dẫn trước, chúng ta đã tìm hiểu về cách làm việc với ESP32 DS18B20 để đo nhiệt độ và hiển thị lên Serial Monitor. Trong bài này, mình sẽ hướng dẫn bạn cách hiển thị nhiệt độ lên Web Server, để chúng ta có thể theo dõi nhiệt độ từ xa qua Internet bằng điện thoại / máy tính nhé!
Chuẩn bị phần cứng
- Mạch ESP32
- Cảm biến nhiệt độ DS18B20
- Điện trở
- Breaboard
- Dây Jumper
Bạn có thể xem lại bài viết về cách làm việc với cảm biến DS18B20 cơ bản tại đây.
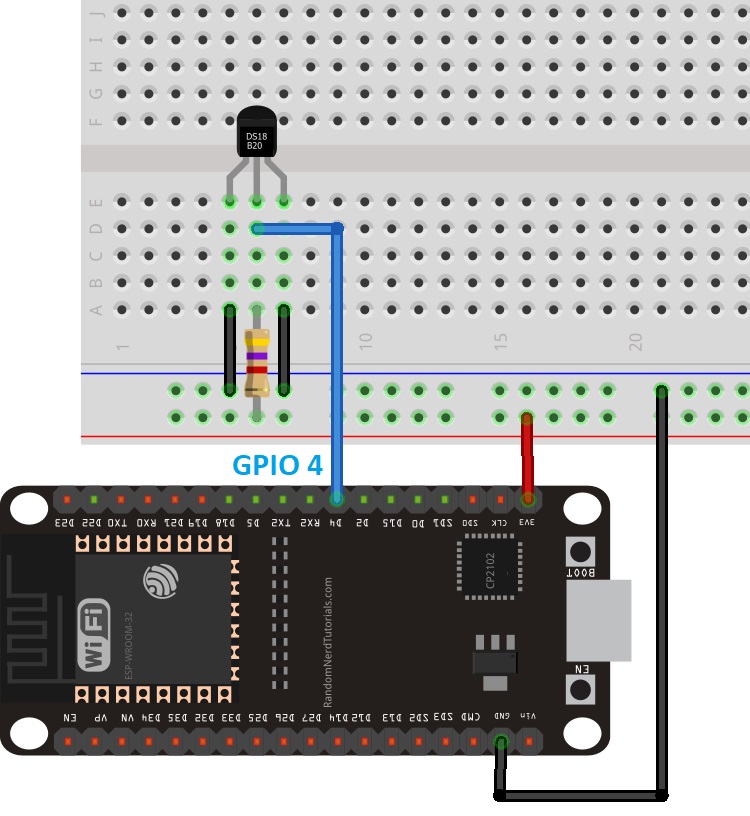
Kết nối phần cứng
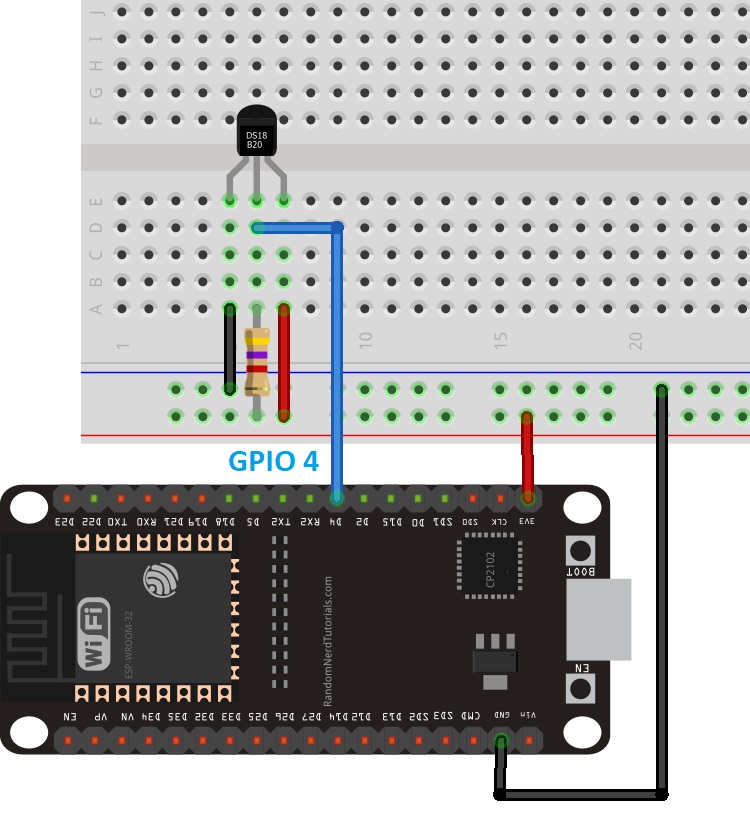
Với cảm biến DS18B20, bạn có thể kết nối theo phương thức ký sinh (cấp nguồn qua dòng dữ liệu) hoặc phương thức Normal (cấp nguồn qua chân VDD) đều được, dưới đây là hướng dẫn cho từng cách:
Mode ký sinh
Mode bình thường
Cài thư viện cần thiết
Trước tiên, để làm việc với cảm biến ESP32 DS18B20, bạn cần cài tiện ích ESP32 trong Arduino IDE. Nếu chưa cài, bạn vui lòng xem hướng dẫn cài ESP32 trong Arduino mà mình đã hướng dẫn nhé!
Sau đó, bạn truy cập vào Sketch >> Include Library >> Manage Libraries và tìm kiếm 2 thư viện bên dưới, sau đó cài đặt rồi khởi động lại Arduino IDE:
- One Wire library by Paul Stoffregen
- Dallas Temperature library
Ngoài ra, trong phần hướng dẫn DS18B20 này, để tạo Web Server chúng ta cần có 2 thư viện là ESPAsyncWebServer library và AsyncTCP.
Cả 2 thư viện này đều không có sẵn trong Manage Libraries, nên bạn cần tải thư mục zip bằng đường link mình có gắn bên trên rồi giải nén >> sao chép thư mục vừa giải nén vào thư mục chứa các thư viện của Arduino IDE nhé!
Hiển thị nhiệt độ từ ESP32 DS18B20 lên Web Server
Đầu tiên, bạn mở Arduino IDE và copy đoạn code sau vào, đổi thông tin mạng WiFi của mình rồi sử dụng nhé!
// Import required libraries
#ifdef ESP32
#include <WiFi.h>
#include <ESPAsyncWebServer.h>
#else
#include <Arduino.h>
#include <ESP8266WiFi.h>
#include <Hash.h>
#include <ESPAsyncTCP.h>
#include <ESPAsyncWebServer.h>
#endif
#include <OneWire.h>
#include <DallasTemperature.h>
// Data wire is connected to GPIO 4
#define ONE_WIRE_BUS 4
// Setup a oneWire instance to communicate with any OneWire devices
OneWire oneWire(ONE_WIRE_BUS);
// Pass our oneWire reference to Dallas Temperature sensor
DallasTemperature sensors(&oneWire);
// Variables to store temperature values
String temperatureF = "";
String temperatureC = "";
// Timer variables
unsigned long lastTime = 0;
unsigned long timerDelay = 30000;
// Replace with your network credentials
const char* ssid = "REPLACE_WITH_YOUR_SSID";
const char* password = "REPLACE_WITH_YOUR_PASSWORD";
// Create AsyncWebServer object on port 80
AsyncWebServer server(80);
String readDSTemperatureC() {
// Call sensors.requestTemperatures() to issue a global temperature and Requests to all devices on the bus
sensors.requestTemperatures();
float tempC = sensors.getTempCByIndex(0);
if(tempC == -127.00) {
Serial.println("Failed to read from DS18B20 sensor");
return "--";
} else {
Serial.print("Temperature Celsius: ");
Serial.println(tempC);
}
return String(tempC);
}
String readDSTemperatureF() {
// Call sensors.requestTemperatures() to issue a global temperature and Requests to all devices on the bus
sensors.requestTemperatures();
float tempF = sensors.getTempFByIndex(0);
if(int(tempF) == -196){
Serial.println("Failed to read from DS18B20 sensor");
return "--";
} else {
Serial.print("Temperature Fahrenheit: ");
Serial.println(tempF);
}
return String(tempF);
}
const char index_html[] PROGMEM = R"rawliteral(
<!DOCTYPE HTML><html>
<head>
<meta name="viewport" content="width=device-width, initial-scale=1">
<link rel="stylesheet" href="https://use.fontawesome.com/releases/v5.7.2/css/all.css" integrity="sha384-fnmOCqbTlWIlj8LyTjo7mOUStjsKC4pOpQbqyi7RrhN7udi9RwhKkMHpvLbHG9Sr" crossorigin="anonymous">
<style>
html {
font-family: Arial;
display: inline-block;
margin: 0px auto;
text-align: center;
}
h2 { font-size: 3.0rem; }
p { font-size: 3.0rem; }
.units { font-size: 1.2rem; }
.ds-labels{
font-size: 1.5rem;
vertical-align:middle;
padding-bottom: 15px;
}
</style>
</head>
<body>
<h2>ESP DS18B20 Server</h2>
<p>
<i class="fas fa-thermometer-half" style="color:#059e8a;"></i>
<span class="ds-labels">Temperature Celsius</span>
<span id="temperaturec">%TEMPERATUREC%</span>
<sup class="units">°C</sup>
</p>
<p>
<i class="fas fa-thermometer-half" style="color:#059e8a;"></i>
<span class="ds-labels">Temperature Fahrenheit</span>
<span id="temperaturef">%TEMPERATUREF%</span>
<sup class="units">°F</sup>
</p>
</body>
<script>
setInterval(function ( ) {
var xhttp = new XMLHttpRequest();
xhttp.onreadystatechange = function() {
if (this.readyState == 4 && this.status == 200) {
document.getElementById("temperaturec").innerHTML = this.responseText;
}
};
xhttp.open("GET", "/temperaturec", true);
xhttp.send();
}, 10000) ;
setInterval(function ( ) {
var xhttp = new XMLHttpRequest();
xhttp.onreadystatechange = function() {
if (this.readyState == 4 && this.status == 200) {
document.getElementById("temperaturef").innerHTML = this.responseText;
}
};
xhttp.open("GET", "/temperaturef", true);
xhttp.send();
}, 10000) ;
</script>
</html>)rawliteral";
// Replaces placeholder with DS18B20 values
String processor(const String& var){
//Serial.println(var);
if(var == "TEMPERATUREC"){
return temperatureC;
}
else if(var == "TEMPERATUREF"){
return temperatureF;
}
return String();
}
void setup(){
// Serial port for debugging purposes
Serial.begin(115200);
Serial.println();
// Start up the DS18B20 library
sensors.begin();
temperatureC = readDSTemperatureC();
temperatureF = readDSTemperatureF();
// Connect to Wi-Fi
WiFi.begin(ssid, password);
Serial.println("Connecting to WiFi");
while (WiFi.status() != WL_CONNECTED) {
delay(500);
Serial.print(".");
}
Serial.println();
// Print ESP Local IP Address
Serial.println(WiFi.localIP());
// Route for root / web page
server.on("/", HTTP_GET, [](AsyncWebServerRequest *request){
request->send_P(200, "text/html", index_html, processor);
});
server.on("/temperaturec", HTTP_GET, [](AsyncWebServerRequest *request){
request->send_P(200, "text/plain", temperatureC.c_str());
});
server.on("/temperaturef", HTTP_GET, [](AsyncWebServerRequest *request){
request->send_P(200, "text/plain", temperatureF.c_str());
});
// Start server
server.begin();
}
void loop(){
if ((millis() - lastTime) > timerDelay) {
temperatureC = readDSTemperatureC();
temperatureF = readDSTemperatureF();
lastTime = millis();
}
}
Bạn có thể đổi mạng WiFi tại câu lệnh sau:
const char* ssid = "REPLACE_WITH_YOUR_SSID";
const char* password = "REPLACE_WITH_YOUR_PASSWORD";Giải thích chương trình
Trong hướng dẫn DS18B20 này, mình sẽ giải thích chi tiết từng câu lệnh để bạn hiểu hơn về cách lập trình nhé!
Khai báo thư viện
Khai báo các thư viện cần dùng trong chương trình:
#include <WiFi.h>
#include <ESPAsyncWebServer.h>
#include <OneWire.h>
#include <DallasTemperature.h>
Khởi tạo cảm biến nhiệt độ DS18B20
Chọn chân GPIO trên ESP32 mà chúng ta kết nối với cảm biến nhiệt độ, trong trường hợp này là GPIO 4:
#define ONE_WIRE_BUS 4Các trường hợp cần thiết để khởi tạo cảm biến ESP32 DS18B20:
// Setup a oneWire instance to communicate with any OneWire devices
OneWire oneWire(ONE_WIRE_BUS);

// Pass our oneWire reference to Dallas Temperature sensor
DallasTemperature sensors(&oneWire);
Khai báo thông tin mạng WiFi
Chèn tên WiFi và mật khẩu WiFi để mạch ESP32 có thể truy cập vào mạng:
const char* ssid = "REPLACE_WITH_YOUR_SSID";
const char* password = "REPLACE_WITH_YOUR_PASSWORD";
Tạo một máy chủ Web không đồng bộ (AsyncWebServer) tại cổng 80:
AsyncWebServer server(80);Hàm để đọc nhiệt độ từ ESP32 DS18B20
Tạo 2 hàm khác nhau để đọc nhiệt độ.
Hàm readDSTemperatureC() đọc giá trị nhiệt độ theo thang đo độ C:
String readDSTemperatureC() {
  // Call sensors.requestTemperatures() to issue a global temperature and Requests to all devices on the bus
  sensors.requestTemperatures();
  float tempC = sensors.getTempCByIndex(0);

  if(tempC == -127.00){
    Serial.println("Failed to read from DS18B20 sensor");
    return "--";
  } else {
    Serial.print("Temperature Celsius: ");
    Serial.println(tempC);
  }
  return String(tempC);
}
Nếu không nhận được giá trị hợp lệ, cảm biến ESP32 DS18B20 sẽ trả về giá trị là -127. Do đó, chúng ta cần đặt câu lệnh điều kiện if – else để hệ thống trả về kết quả là dấu gạch ngang (–) khi cảm biến không nhận được giá trị hợp lệ:
if(tempC == -127.00){
  Serial.println("Failed to read from DS18B20 sensor");
  return "--";
Nếu cần đọc nhiệt độ theo thang đo độ F, bạn có thể đổi thành hàm reaDSTemperatureF().
return String(tempC);Các kết quả đọc được sẽ trả về dưới dạng chuối (string). Để chuyển đổi float thành một chuỗi, bạn dùng câu lệnh sau:
Tạo Web Server
Mình sẽ hướng dẫn bạn cách tạo một trang Web bằng HTML và CSS.
Trong HTML mình sẽ có TEMPERATUREC và TEMPERATUREF được đặt giữa các dấu %, đây là nơi chứa giá trị đo được từ cảm biến nhiệt độ. Giá trị này sẽ thay đổi liên tục tùy vào nhiệt độ đo được.
Mình đã có khá nhiều bài viết chi tiết về Web Server trước đó, bạn có thể tham khảo một số dự án sau để hiểu hơn về cách tạo Web Server:
Xử lý
Chúng ta cần tạo một bộ xử lý processor() để thay thế các giá trị giữa dấu % thành giá trị nhiệt độ thực tế:
String processor(const String& var){
  //Serial.println(var);
  if(var == "TEMPERATUREC"){
    return readDSTemperatureC();
  }
  else if(var == "TEMPERATUREF"){
    return readDSTemperatureF();
  }
  return String();
}
Khi được yêu cầu, Web Server sẽ kiểm tra HTML xem thử có bất kỳ nơi nào có các giá trị đặt giữa các dấu % không. Nếu tìm thấy TEMPERATUREC trong các %, hệ thống sẽ đọc giá trị nhiệt độ (theo độ C) được gửi về từ cảm biến ESP32 DS18B20 và thay vào đó:
if(var == "TEMPERATUREC"){
  return readDSTemperatureC();
}
Nếu tìm thấy TEMPERATUREF, chúng ta trả về nhiệt độ theo thang đo F
else if(var == "TEMPERATUREF"){
  return readDSTemperatureF();
}
setting()
Tạo Serial Monitor để quan sát chương trình hoạt động và gỡ lỗi khi cần:
Serial.begin(115200);Khởi tạo cảm biến nhiệt độ ESP32 DS18B20:
sensors.begin();Kết nối với mạng WIFi và in địa chỉ IP của mạch ESP32 lên Serial Monitor:
WiFi.begin(ssid, password);
Serial.println("Connecting to WiFi");
while (WiFi.status() != WL_CONNECTED) {
  delay(500);
  Serial.print(".");
}
Serial.println();

// Print ESP8266 Local IP Address
Serial.println(WiFi.localIP());
Chương trình để xử lý Web Server:
server.on("/", HTTP_GET, [](AsyncWebServerRequest *request){
  request->send_P(200, "text/html", index_html, processor);
});
server.on("/temperaturec", HTTP_GET, [](AsyncWebServerRequest *request){
  request->send_P(200, "text/plain", readDSTemperatureC().c_str());
});
server.on("/temperaturef", HTTP_GET, [](AsyncWebServerRequest *request){
  request->send_P(200, "text/plain", readDSTemperatureF().c_str());
});
Khi chúng ta gửi yêu cầu qua root URL, chúng ta sẽ gửi đoạn văn bản HTML trong đó chứa các biến index_html. Ngoài ra, chúng ta cũng cần tạo các hàm processor để thay thế giá trị trong các ký tự % thành giá trị đúng:
server.on("/", HTTP_GET, [](AsyncWebServerRequest *request){
  request->send_P(200, "text/html", index_html, processor);
});
Thêm các trình xử lý bổ sung để cập nhật giá trị nhiệt độ khi có sự thay đổi:
server.on("/temperaturec", HTTP_GET, [](AsyncWebServerRequest *request){
  request->send_P(200, "text/plain", readDSTemperatureC().c_str());
});
Thực hiện tương tự với nhiệt độ theo thang đo F:
server.on("/temperaturef", HTTP_GET, [](AsyncWebServerRequest *request){
  request->send_P(200, "text/plain", readDSTemperatureF().c_str());
});
Khởi chạy Server:
server.begin();Vì trong hướng dẫn DS18B20 này, mình đang dùng máy chủ không đồng bộ nên trong vòng lặp loop, chúng ta không cần viết gì thêm:
void loop(){

}
Kết quả
Sau khi upload code, bạn hãy mở Serial Monitor (tốc độ 115200) nhé! Nhấn nút Reset (RST) trên ESP32, chờ vài giây để lấy địa chỉ IP.
Trong mạng cục bộ, mở trình duyệt Web như Google Chrome, nhập IP vào thanh tìm kiếm.
Một trang Web sẽ xuất hiện. Tại đây, bạn có thể quan sát nhiệt độ đo được từ cảm biến ESP32 DS18B20 cả ở thang đo độ C lẫn thang đo độ F.
Khi nhiệt độ thay đổi, trang Web sẽ tự động cập nhật giá trị. Bạn không cần phải F5 lại trang.

Lời kết
Vậy là chúng ta đã cùng nhau tìm hiểu qua cách đo và hiển thị nhiệt độ từ ESP32 DS18B20 lên Web Server. Hy vọng bạn thấy bài hướng dẫn DS18B20 này hữu ích.
Ngoài ra, có một số bài hướng dẫn với cảm biến / module ESP32 khác mà IoTZone nghĩ bạn sẽ thích: